Ilr8038@legacy41691019 (talk | contribs) m (Final Edits and Internal /docu/ NOTES added.) |
Ilr8038@legacy41691019 (talk | contribs) m (Arid Sea --> "The Arid Sea") |
||
| Line 22: | Line 22: | ||
'''Hazards:'''<big> →[[Image:Burning.jpg|25px]] [[Image:Plague_Touch.jpg|25px]] →[[Image:Chilblains.jpg|25px]] →[[Image:Meteor.jpg|25px]](<small>[[Adjacent|A]]</small>)</big> |
'''Hazards:'''<big> →[[Image:Burning.jpg|25px]] [[Image:Plague_Touch.jpg|25px]] →[[Image:Chilblains.jpg|25px]] →[[Image:Meteor.jpg|25px]](<small>[[Adjacent|A]]</small>)</big> |
||
| − | This is a very short and clear run once you get beyond the first Teleporter and stay on the main route. There are few enemies who will knock you down or body-block you. However, be wary of the massive population of [[Jade Scarab|Insects]] between Amnoon and the first Teleporter that will unburrow. AKA: "Pop-up Mobs". In addition to Enchant Stripping, they also use Touch-Skills which will cause their A.I. to chase you for very long distances unless you maintain a run speed greater than 25%. It is also recommended that you not rely on defensive skills that might |
+ | This is a very short and clear run once you get beyond the first Teleporter and stay on the main route. There are few enemies who will knock you down or body-block you. However, be wary of the massive population of [[Jade Scarab|Insects]] between Amnoon and the first Teleporter that will unburrow. AKA: "Pop-up Mobs". In addition to Enchant Stripping, they also use Touch-Skills which will cause their A.I. to chase you for very long distances unless you maintain a run speed greater than 25%. It is also recommended that you not rely on defensive skills that might apply conditions to your foes. |
[[Image:Sands_T.jpg|thumb|right|Teleporting /w Heroes]] <!-- CUSTOM SCREENSHOT, RIGHT ALIGN --> |
[[Image:Sands_T.jpg|thumb|right|Teleporting /w Heroes]] <!-- CUSTOM SCREENSHOT, RIGHT ALIGN --> |
||
=== Objective: Teleporter === |
=== Objective: Teleporter === |
||
| Line 44: | Line 44: | ||
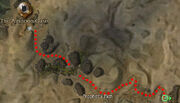
This alternative route lacks the option to visit Heroes' Audience but is also less complicated as long as you can out-run the Hydras, Enchanted, Scarabs, and [[Desert Griffon]]s that swarm this trail. The Griffons in particular are the biggest obstacle as they can instantly surround you, even out in the open, if your connection Lags even a little. And using a Crippling counter measure to slow them down is also risky as there are typically Jade Scarabs closing in on you at the same time, once the two Trails merge. There is also typically a group of Elementals and a Sandwurm adjacent to the last Teleporter that you '''must''' break "aggro" with before attempting to activate it. ...Once through it, only 1 group of enchanted remains between you and the Dunes. |
This alternative route lacks the option to visit Heroes' Audience but is also less complicated as long as you can out-run the Hydras, Enchanted, Scarabs, and [[Desert Griffon]]s that swarm this trail. The Griffons in particular are the biggest obstacle as they can instantly surround you, even out in the open, if your connection Lags even a little. And using a Crippling counter measure to slow them down is also risky as there are typically Jade Scarabs closing in on you at the same time, once the two Trails merge. There is also typically a group of Elementals and a Sandwurm adjacent to the last Teleporter that you '''must''' break "aggro" with before attempting to activate it. ...Once through it, only 1 group of enchanted remains between you and the Dunes. |
||
*When leaving Augury, be sure <u>not</u> to take the southern-most trail, as it is a '''dead end''' loaded with Griffons |
*When leaving Augury, be sure <u>not</u> to take the southern-most trail, as it is a '''dead end''' loaded with Griffons |
||
| − | *Players with sub-par Connections can bypass this area by dipping into |
+ | *Players with sub-par Connections can bypass this area by dipping into [[the Arid Sea]] and hugging its west wall. |
*There is a "back door alley" leading directly to the mission-destination tucked away on the right side of the large sink-hole, right before you reach the Teleporter. However it requires Great Speed and collision avoidance to zip past the Boss Griffon and the remaining columns of Enchanted positioned within it. |
*There is a "back door alley" leading directly to the mission-destination tucked away on the right side of the large sink-hole, right before you reach the Teleporter. However it requires Great Speed and collision avoidance to zip past the Boss Griffon and the remaining columns of Enchanted positioned within it. |
||
Revision as of 11:37, 31 December 2008
| NOTE: This page was rewritten to include 3 other Articles. For more info, see Category talk:Running guides |
DISCLAIMER: The information in this article is based on experimental research conducted by the community, and may contain inaccuracies and speculation. While we strive for accuracy in these articles, we make no claims of experimental rigor or unbiased conclusions. Caveat lector.
Introduction: The four major "runs" in the Crystal Desert (Also referred to as the Desert "Tour") are generally not as popular as the runs from Ascalon to Lion's Arch or Droknar's Forge, but neither have they lost their importance as all Prophecies characters are required to complete them none the less in order to Ascend and change professions. Running requests and offers can still be seen in every outpost along these paths even today. And Amateur runners themselves can complete these runs too with almost any Primary profession as long as they come prepared for the unique hazards presented here in.

| Expanded Hazard Key |
|---|
| Trap Conditions: |
| Other Conditions: |
| Disable Skills:(cause: |
| Knockdowns: |
From Amnoon Oasis to Augury Rock

Prophet's Path Overview
Hazards: →![]()
![]() →
→![]() →
→![]() (A)
(A)
This is a very short and clear run once you get beyond the first Teleporter and stay on the main route. There are few enemies who will knock you down or body-block you. However, be wary of the massive population of Insects between Amnoon and the first Teleporter that will unburrow. AKA: "Pop-up Mobs". In addition to Enchant Stripping, they also use Touch-Skills which will cause their A.I. to chase you for very long distances unless you maintain a run speed greater than 25%. It is also recommended that you not rely on defensive skills that might apply conditions to your foes.

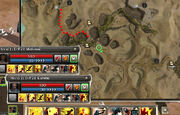
Teleporting /w Heroes
Objective: Teleporter
The teleporter can often be difficult to activate if you are surrounded by Insects, so it is highly recommended that you have Heroes or another Player standing just outside radar-range (second to last red-dot in the image shown to the right) as a diversion while you activate the Teleporter.
- Tip: The easiest way to get your Heroes to the first teleporter safely, is to hug the right side of the path and maintain a constant 33% run-speed on them with run-buffs(shouts & stances) that cannot be stripped by Chilblains.
On the last stretch of the journey, the only threats remaining are Nest Builders who lay down Flame Traps and Barbed Traps.
From Augury Rock to Dunes of Despair


Western exit from Augury
Western Entrance
Hazards: →![]() File:Bleeding.JPG
File:Bleeding.JPG ![]()
![]()
![]() →
→![]() →
→![]()
![]() (N) [
(N) [ ![]() ]Wurm
]Wurm
This path may be preferred by Prophecies spell caster Characters because it also leads to Heroes' Audience. However this path (south-west of Augury) become much more chaotic after a 2006 Alteration that affected the whole Area. Some Creatures will often fight with other Creatures, and you may lose your Enchantments if you happen to run through a ![]() Well of the Profane
Well of the Profane


...Also be ready for Sand Wurms in the channel that leads to the Vulture Drifts entrance. Heroes' Audience (a short detour to the west) is also marked on the Map. Upon entering the Drifts via this route, you will usually be greeted by the Shock of a very large number of Sand Elementals as well as a Drake or two, right before the two trails Merge.
- For "group travel", see the original guide: Augury Rock to Dunes of Despair
Eastern Entrance
Hazards: →![]() →
→![]() ("Lag")
("Lag") ![]() (A)
(A) ![]() (
(![]() )
) ![]() (Stomp)
(Stomp)
This alternative route lacks the option to visit Heroes' Audience but is also less complicated as long as you can out-run the Hydras, Enchanted, Scarabs, and Desert Griffons that swarm this trail. The Griffons in particular are the biggest obstacle as they can instantly surround you, even out in the open, if your connection Lags even a little. And using a Crippling counter measure to slow them down is also risky as there are typically Jade Scarabs closing in on you at the same time, once the two Trails merge. There is also typically a group of Elementals and a Sandwurm adjacent to the last Teleporter that you must break "aggro" with before attempting to activate it. ...Once through it, only 1 group of enchanted remains between you and the Dunes.
- When leaving Augury, be sure not to take the southern-most trail, as it is a dead end loaded with Griffons
- Players with sub-par Connections can bypass this area by dipping into the Arid Sea and hugging its west wall.
- There is a "back door alley" leading directly to the mission-destination tucked away on the right side of the large sink-hole, right before you reach the Teleporter. However it requires Great Speed and collision avoidance to zip past the Boss Griffon and the remaining columns of Enchanted positioned within it.
From Augury Rock to Elona Reach


Elona Reach paths
(Non-Teleport routes in Green)
When attempting to run to Elona Reach(outpost) through Skyward_Reach and Diviner's Ascent, stopping to use the teleporters can be too risky if Hydras, Sand Drakes, or Jade Scarabs and Devourers are near them. Using the Diversion strategy described in the #Objective: Teleporter section, can greatly improve your chances on the second teleporter, which always has a pop-up spawn of Scarabs nearby. Meanwhile running the alternate path(shown in green on the map) will take you around every Teleporter, but presents Hazards in the form of Sand Wurms and a Boss-Spawn of Hyrdras.
Note: If your group passes the Teleporter but Dies, You will respawn in front of Elona Reach
Destiny's Gorge
Some runners will make a detour into Destiny's Gorge to make the run to Thirsty River shorter. This is not advised unless you have overlapping Run-Skills or an Elite that prevents spell targeting.
- There are a few Rockshot Devourers along the way, but not enough to present a serious Trap Damage hazard.
- For "group travel", see the original guide: Augury Rock to Elona Reach
From Augury Rock to Thirsty River


Skyward and Scar combined
Northern to Center route
In Skyward Reach you will encounter multiple Hydra groups again, but it is often possible to avoid many -or- all of these groups, or simply run through them. The Losaru are far more densely packed in than the hydras however, making a run through them harder. Once you clear the Losaru you'll be at Destiny's Gorge and ready to head out into The Scar
From Destiny's, you can head directly south and begin activating the central Teleporter (marked A on the Map) however you will likely be interrupted by Hydras so it is best to have a Hero or henchman take their aggro first by flagging them far away from the Teleporter once they aggro the Hydras. Do not linger at the Teleporter's exit as 3 to 4 groups of Centaurs patrol right nearby. From there, it's a straight shot south to Thirsty through half a dozen Centaur groups and multiple Pop-up Scarabs. Take extra care not rely solely on Enchants, or get surrounded by these mobs.
South Western route
This is actually the easiest route if you make it past all the Hydra in Skyward Reach, but gets tricky at the Bridge(point C on the map) if you attempt to cross it while Centaurs are directly underneath it. Though the Scarabs and Behemoths rarely present problems.
 Bug! - Centaurs under the Bridge can obstruct your path as the game does not check elevation for collision-detection.
North Eastern route
The Northern route requires you to take larger amounts of damage from Sand Giants and a few Enchanted. This is the traditional route for most players but also requires you to out-distance or sneak around a large group of Enchanted right before you reach the Teleporter(marked D on the Map). After the Teleporter it gets easy again.
- For "group travel", see the original guide: Augury Rock to Thirsty River, where-in the second Teleporter on the center mound (Marked B on the map) is the quickest route, especially if you have a way to cripple the fast-running Desert Griffons