Progger12420@legacy41695098 (talk | contribs) m (typo) |
Demonic Sin Ex@legacy41686250 (talk | contribs) No edit summary |
||
| (21 intermediate revisions by 7 users not shown) | |||
| Line 1: | Line 1: | ||
| + | The four major "runs" in the [[Crystal Desert]] (''Also referred to as the Desert "Tour"'') is a simple run that can be done with any profession and any skill level. |
||
| − | {{Notice|This page is under renovation for the week of (25,Dec.'08) through (Jan.2009). For info, see [[Category talk:Running guides]]}} |
||
| − | {{research}} |
||
| + | '''Note on maps:''' When the maps include both a <span style="color:red">red</span> and a <span style="color:green">green</span> path, the <span style="color:green">green</span> path is recommended for solo runners as it avoids [[teleporter]]s, which can be very difficult to activate as you will usually have a large group of monsters chasing you. The <span style="color:red">red</span> path is only recommended for groups that are fighting their way through the desert. |
||
| ⚫ | |||
| + | [[Image:Desert_Tour_Wideview.jpg|right]] |
||
| ⚫ | |||
| + | __TOC__ |
||
| − | [[Image:Sands Of Souls map.jpg|thumb|left]] |
||
| + | <div style="clear:both;"></div> |
||
| − | <big>'''Hazards:''' →[[Condition|C]]:[[Image:Crippled.jpg|36px]] [[Image:Barbed_Trap.jpg|36px]] [[Image:Plague_Touch.jpg|36px]] →[[Enchantment_removal_skills_quick_reference|Strip]]:[[Image:Chilblains.jpg|36px]] →[[Knockdown_skills_quick_reference|Knock]]:[[Image:Meteor.jpg|36px]](<small>[[Adjacent|A]]</small>) [[Image:Mighty_Blow.jpg|36px]]([[Image:Adrenaline.png]])</big> |
||
| + | <div style="background:#ddd;border:1px dashed silver"> |
||
| ⚫ | This is a very short and clear run once you get beyond the first |
||
| + | {| class="wikitable collapsible" |
||
| + | ! <big>Hazard Key</big> |
||
| + | |- |
||
| + | | '''[[Trap]] conditions:''' {{skill icon|Crippled}} ([[Barbed Trap]]) |
||
| + | |- |
||
| + | | '''Other [[condition]]s:'''{{skill icon|Crippled}} ([[Hamstring]]), ) |
||
| + | |- |
||
| + | | '''[[Disable_skills_quick_reference|Disable skills]]: '''(cause: {{skill icon|Diversion}}) | ←→ | '''[[Enchantment removal skills quick reference|Enchantment stripping]]: ''' {{skill icon|Chilblains}} <!-- EDIT NOTE: Stripping categorized with Disabling to conserve table space --> |
||
| + | |- |
||
| + | | '''[[Knockdown_skills_quick_reference|Knockdowns]]: ''' {{skill icon|Meteor}}, {{skill icon|Shock}}(touch), <big>[ [[Image:Wurm Tremor.jpg]] ]</big>[[Wurm (species)|Wurm]], [[Image:Monster_skill.jpg|25px]] [[Giant Stomp]] <!-- EDIT NOTE: WurmTremor jpg/ICON in BRACKETS in case it disappears again --> |
||
| + | |} |
||
| + | </div> |
||
| ⚫ | |||
| − | === Objective: Teleporter === |
||
| − | [[Image: |
+ | [[Image:Sands Of Souls map.jpg|thumb|Prophet's Path overview]] |
| + | ; Hazards |
||
| − | The teleporter can often be difficult to activate if you are surrounded by Insects, so it is highly recommended that you have Heroes or another Player standing just outside radar-range (''second to last red-dot in the image shown to the right'') as a diversion while you activate the [[Teleporter]]. |
||
| + | : →[[Image:Chilblains.jpg|25px]] →[[Image:Meteor.jpg|25px]]([[Adjacent]]) |
||
| ⚫ | |||
| − | *Tip: The easiest way to get your Heroes to the first teleporter safely, is to hug the right side of the path and maintain a constant 33% run-speed on them with [[Movement_speed_skills_quick_reference|run-buffs]](shouts & stances) that cannot be stripped by Chilblains. |
||
| + | <div style="clear:both;"></div> |
||
| − | <br><br> |
||
| + | |||
| − | On the last stretch of the journey the only threats, are the [[Scarab Nest Builder|Nest Builders]] who lay down many [[Flame Trap]]s and [[Dust Trap]]s. |
||
| ⚫ | |||
| + | [[Image:Sands_T.jpg|thumb|Teleporting /w heroes]] |
||
| + | The teleporter can often be difficult for beginners to activate if you didn't deaggro properly, so if you need to, deaggro before activiating the teleporters. |
||
| + | |||
| + | On the last stretch of the journey, the only threats remaining are cripples. |
||
| + | |||
| + | == Augury Rock to [[Dunes of Despair (outpost)|Dunes of Despair]] == |
||
| + | === Western route === |
||
| + | [[Image:AuguryRockToDunesOfDespairMap1.jpg|thumb|Map of the western route]] |
||
| + | ; Hazards |
||
| + | : [[Image:Crippled.jpg|25px]] →[[Image:Chilblains.jpg|25px]] →[[Image:Shock.jpg|25px]] [ [[Image:Wurm Tremor.jpg]] ] [[Wurm (species)|Wurm]] |
||
| + | |||
| + | Be ready for Sand Wurms in the channel that leads to the [[Vulture Drifts]] entrance. [[Heroes' Audience]] (a short detour to the west) is also marked on the map. Nothing should cause trouble. |
||
| + | <div style="clear:both;"></div> |
||
| + | |||
| + | === Eastern route === |
||
| + | [[Image:AuguryRockToDunesOfDespairMap2.jpg|thumb|Map of the eastern routes]] |
||
| + | ; Hazards |
||
| + | : →[[Image:Crippled.jpg|25px]] [[Image:Meteor.jpg|25px]]([[Adjacent]]) [[Image:Monster_skill.jpg|25px]]([[Giant Stomp]]) |
||
| + | |||
| + | This alternative route does not allow you visit Heroes' Audience. There is also typically a group of Elementals and a Sandwurm adjacent to the last teleporter that you should deaggro with before attempting to activate it. Once through it, only 1 group of enchanted remains between you and the Dunes. |
||
| + | |||
| + | * When leaving Augury, be sure '''not''' to take the southern-most trail, as it is a '''dead end''' loaded with Griffons. |
||
| + | * Players with sub-par connections can bypass this area by dipping into [[the Arid Sea]] and hugging its west wall. |
||
| + | * There is a "back door alley" leading directly to the mission-destination tucked away on the right side of the large sink-hole, right before you reach the Teleporter. |
||
| + | <div style="clear:both;"></div> |
||
| + | |||
| + | == Augury Rock to [[Elona Reach (outpost)|Elona Reach]] == |
||
| + | [[Image:AuguryRockToElonaReachMap.jpg|thumb|Map to Elona Reach]] |
||
| + | ; Hazards |
||
| + | : →[[Image:Diversion.jpg|25px]] →[[Image:Meteor.jpg|25px]]([[Adjacent]]) [ [[Image:Wurm Tremor.jpg]] ] [[Wurm (species)|Wurm]] |
||
| + | |||
| + | When attempting to run to Elona Reach through [[Skyward_Reach]] and [[Diviner's Ascent]], stopping to use the teleporters can be diffcult if [[Hydra (Crystal Desert)|Hydra]]s are near them and you don't have an anti-kd. Meanwhile running the alternate path (''shown in green on the map'') is slower but lets you avoid the teleporter. |
||
| + | |||
| + | |||
| + | === Destiny's Gorge === |
||
| + | Some runners will make a detour into [[Destiny's Gorge]] to make the run to [[Thirsty River]] shorter. Taking this shorter route is recommened. |
||
| + | |||
| + | |||
| + | == Augury Rock to [[Thirsty River (outpost)|Thirsty River]] == |
||
| + | [[Image:AuguryRockToThirstyRiverMap2.jpg|thumb|All routes to Thirsty River]] |
||
| + | === Northern routes === |
||
| + | ; Hazards |
||
| + | : →[[Image:Crippled.jpg|25px]] →[[Image:Diversion.jpg|25px]] [[Image:Chilblains.jpg|25px]] [[Image:Meteor.jpg|25px]]([[Adjacent]]) [[Image:Monster_skill.jpg|25px]]([[Giant Stomp|Stomp]]) |
||
| + | |||
| + | In [[Skyward Reach]] you will encounter multiple Hydra groups again, but it is often possible to avoid many of them, or simply run through them. Clear the Losaru you'll be at Destiny's Gorge and ready to head out into [[The Scar]]. |
||
| + | |||
| + | From Destiny's, you can take one of two paths: the eastern route, where you must deal with griffons, giants, and Enchanted; or the central route, populated by masses of centaurs. The eastern route is fairly simple, with the teleporter being the most difficult part. Either out-distance or sneak around the large group of Enchanted just before it (''marked '''D''' on the Map''). After the teleporter it gets easy again. |
||
| + | |||
| + | The central route is just slightly more difficult. Start by activating the nearby teleporter (''marked '''A''' on the map''). USe your anti-kd when activating the teleporter near Hydras. From there, it's a straight shot south to Thirsty through half a dozen Centaur groups and multiple pop-up Scarabs. |
||
| + | |||
| + | === Southern route === |
||
| + | ; Hazards |
||
| + | : →[[Image:Chilblains.jpg|25px]] → →[[Image:Meteor.jpg|25px]]([[Adjacent]]) |
||
| + | |||
| + | This is actually the easiest route if you make it past all the Hydra in [[Skyward Reach]]. |
||
[[Category:Running guides]] |
[[Category:Running guides]] |
||
Latest revision as of 03:40, 26 July 2011
The four major "runs" in the Crystal Desert (Also referred to as the Desert "Tour") is a simple run that can be done with any profession and any skill level.
Note on maps: When the maps include both a red and a green path, the green path is recommended for solo runners as it avoids teleporters, which can be very difficult to activate as you will usually have a large group of monsters chasing you. The red path is only recommended for groups that are fighting their way through the desert.

| Hazard Key |
|---|
| Trap conditions: |
| Other conditions: |
| Disable skills: (cause: |
| Knockdowns: |
Amnoon Oasis to Augury Rock[ | ]

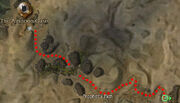
Prophet's Path overview
- Hazards
- →
 →(Adjacent)
This is a very short and clear run once you get beyond the first teleporter and stay on the main route. There are few enemies who will knock you down or body-block you. However, be wary of pop-up Jade Scarabs between Amnoon and the first teleporter. They strip enchants.
Teleporter[ | ]

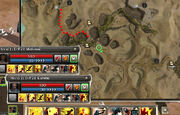
Teleporting /w heroes
The teleporter can often be difficult for beginners to activate if you didn't deaggro properly, so if you need to, deaggro before activiating the teleporters.
On the last stretch of the journey, the only threats remaining are cripples.
Augury Rock to Dunes of Despair[ | ]
Western route[ | ]


Map of the western route
- Hazards
- → → [ ] Wurm
Be ready for Sand Wurms in the channel that leads to the Vulture Drifts entrance. Heroes' Audience (a short detour to the west) is also marked on the map. Nothing should cause trouble.
Eastern route[ | ]


Map of the eastern routes
- Hazards
- → (Adjacent) (Giant Stomp)
This alternative route does not allow you visit Heroes' Audience. There is also typically a group of Elementals and a Sandwurm adjacent to the last teleporter that you should deaggro with before attempting to activate it. Once through it, only 1 group of enchanted remains between you and the Dunes.
- When leaving Augury, be sure not to take the southern-most trail, as it is a dead end loaded with Griffons.
- Players with sub-par connections can bypass this area by dipping into the Arid Sea and hugging its west wall.
- There is a "back door alley" leading directly to the mission-destination tucked away on the right side of the large sink-hole, right before you reach the Teleporter.
Augury Rock to Elona Reach[ | ]


Map to Elona Reach
When attempting to run to Elona Reach through Skyward_Reach and Diviner's Ascent, stopping to use the teleporters can be diffcult if Hydras are near them and you don't have an anti-kd. Meanwhile running the alternate path (shown in green on the map) is slower but lets you avoid the teleporter.
Destiny's Gorge[ | ]
Some runners will make a detour into Destiny's Gorge to make the run to Thirsty River shorter. Taking this shorter route is recommened.
Augury Rock to Thirsty River[ | ]


All routes to Thirsty River
Northern routes[ | ]
In Skyward Reach you will encounter multiple Hydra groups again, but it is often possible to avoid many of them, or simply run through them. Clear the Losaru you'll be at Destiny's Gorge and ready to head out into The Scar.
From Destiny's, you can take one of two paths: the eastern route, where you must deal with griffons, giants, and Enchanted; or the central route, populated by masses of centaurs. The eastern route is fairly simple, with the teleporter being the most difficult part. Either out-distance or sneak around the large group of Enchanted just before it (marked D on the Map). After the teleporter it gets easy again.
The central route is just slightly more difficult. Start by activating the nearby teleporter (marked A on the map). USe your anti-kd when activating the teleporter near Hydras. From there, it's a straight shot south to Thirsty through half a dozen Centaur groups and multiple pop-up Scarabs.
Southern route[ | ]
- Hazards
- → → →(Adjacent)
This is actually the easiest route if you make it past all the Hydra in Skyward Reach.