| Arachni's Haunt | ||||||||||||||||
|---|---|---|---|---|---|---|---|---|---|---|---|---|---|---|---|---|

| ||||||||||||||||
| Dungeon | ||||||||||||||||
| ||||||||||||||||
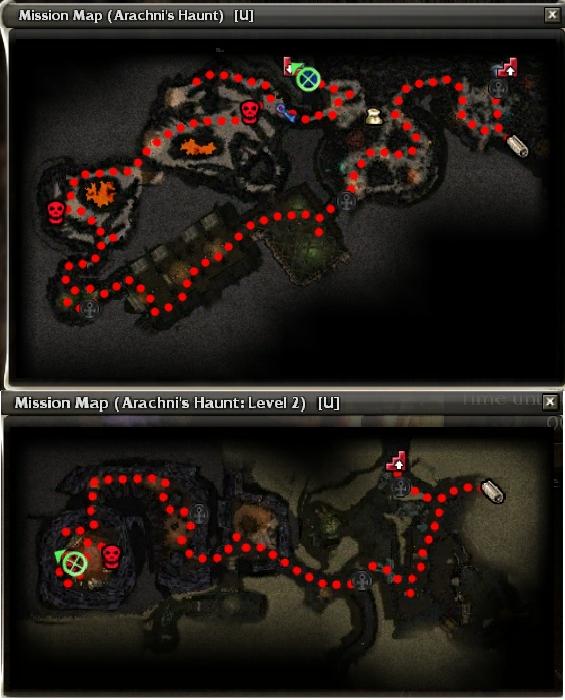
| Map | ||||||||||||||||
|
Description[ | ]
Arachni's Haunt is a 2-level dungeon. The quest Scrambled Reinforcements is required to progress beyond the first floor to defeat Arachni.
Getting there[ | ]
Go southwest from Rata Sum through Magus Stones. The entrance to the Haunt is in the southwest corner.
NPCs[ | ]
- Collectors
- Others
 20 Commander Hixx
 20 Hudd
- 20 Vask
- 1 Beacon of Droknar
Walkthrough[ | ]


Path to Arachni's Haunt
When you first arrive, the dungeon appears scarcely populated with enemies. Do not be fooled. As you attack the visible enemies, groups of Ooze will spawn, including Earthbound Ooze. The Ooze can replicate themselves using Ooze Division, increasing their numbers rapidly. They will quickly overwhelm the unprepared using AoE damage. Stay spread out and pull carefully; try not to pick off too many groups of ooze at once.
As you proceed past the poison dart room, several huge balls of fire will start rolling towards you, one at a time. Although death-by-fireball does not cause Death Penalty, they can take out key party members during combat resulting in a wipe. (Plus, it is more than a little embarrassing.) Lok the Mischievous also tosses fireballs, but these are more easily avoided. Lok himself can be easily defeated with ranged attack, because he refuses to move far from his original location.
To spawn the spider bosses that carry the dungeon keys, you have to use an Asura Flame Staff to ignite 5 different spider eggs on each level. Each time you burn an egg, a large group of spiders will spawn, with the final group including a Spider Matriarch allowing you passage to the next area. Light the eggs one at a time in order to avoid being overwhelmed by the spawns.
At various stages, your way will be blocked by a spider web. These, too, can be burned by the staff, although it often pays to wait so that you can attack any foes on the other side at ranged or caster distance. Leaving the web up also forces the spiders to group together making them easy targets for AoE skills.
In the final room, you will find another set of eggs to burn in order to get Arachni herself to spawn. She can be defeated using the same tactics that worked elsewhere or hiding behind rock columns and using ranged spells that do not require a line-of-sight. Spiteful Spirit and Pain Inverter work well to counter her attacks, although some parties like to use interrupts.
Recommended skills[ | ]
- Condition removal skills to counter poison from objects and the spiders.
- Hex removal skills to counter spider hexes.
- Party heals, to counter degeneration.
- Anti-melee skills, wards, and wells against the spiders. Also Blinding skills, or skills such as Price of Failure, Reckless Haste, and Spiteful Spirit make the final boss battle much easier.
- Interrupts and skills like Diversion are helpful against Arachni.
- There are enough corpses for as many Minion Masters as you can bring. Boost the damage outupt of minions with skills such as Barbs and Mark of Pain.
- Caution: Ominous Ooze will steal the minions using Verata's Gaze.
- Winds, since there is a lot of ranged damage.
- AoE skills are especially effective, since the large groups of spiders are almost always clumped together.
Bestiary[ | ]
- Elementals & Djinni
- 24 Burning Spirit
- 24 Roaring Ether (floor 1)
- 24 Flowstone Elemental (floor 1)
- 20 Flame Guardian (floor 2)
- Ettins:
- 28 (30) Forge Master
- Insects
- 20 Thorn Beetle Queen (floor 2)
- 20 Ghosteater Beetle (floor 2)
- 20 Thorn Beetle (floor 2)
- Incubus
- 20 Cryptwing Incubus (floor 2)
- 20 Bloodbath Incubus (floor 2)
- 20 Bloodthirst Incubus (floor 2)
- Ooze
- 20 Ominous Ooze (floor 1)
- 20 Aggressive Ooze (floor 1)
- 20 Earthbound Ooze (floor 1)
- Plants
- 15 Parasitic Growth (floor 1)
- 20 Cave Aloe (floor 1)
- 20 Corrupted Aloe (floor 1)
- 10 Fungal Spore (floor 1)
- Skelk
- 24 Skelk Corrupter (floor 1)
- 24 Skelk Slasher (floor 1)
- Spiders
- 14 Spider (floors 1 and 2)
- 20-24 Needling Lavastrider (floors 1 and 2)
- 24 Venomweaver (floors 1 and 2)
- 24 Lifeweaver (floors 1 and 2)
- 24 Painweaver (floors 1 and 2)
- 24 Bloodweaver (floors 1 and 2)
Bosses[ | ]
- Elemental
- 28 Lok The Mischievous (floor 1) (Savannah Heat)
- Spiders
- 28 Brood Warden (floor 1) (Crippling Shot)
- 26 Spider Matriarch (floors 1 and 2) (Stunning Strike)
Boss-like foes[ | ]
Light of Deldrimor Rewards[ | ]


Map of the previous secret area showing the entrance.
- Level 1
- Dwarven Ghost: in the room after the second Beacon of Droknar, along the southern wall, right in the center.
- Secret switch: in the large room where Lok The Mischievous is located. It is located in the rear, right behind the second to last large column on the left side.
- The passage that opens up is located in the center of the southern wall in the same room and contains three Hidden Treasures and one Dwarven Ghost.
- Dwarven Ghost: in the first room of the secret passage.
- Dwarven Ghost: in the large cavern with the first Spider Matriarch. From the passage with the poison traps, turn right and go up the slope. Turn left and cross the bridge.
- Hidden Treasure: two are located just after the second Spider Matriarch. One is near the spider web; the other is up the slope.
- Level 2
- Secret Switch: near the first Asura Flame Staff. After zoning, head east through a doorway to where your path intersects another (two torches will be on your right; several corpses will be on your left). The secret switch is located along the center of the wall in front of you. It opens a passage just behind the Area Map.
- Hidden Treasure: two inside the secret passage.
- Dwarven Ghost: East of the second Beacon of Droknar, in the room with several caskets flooded with water. Look for it next to the northern-most casket (the only one that is not covered).
- Hidden Treasure: a bit east of the ghost.
- Hidden Treasure: in the passage that runs south from the second Beacon of Droknar, between the 3rd column on the left and the 2nd column on the right.
- Hidden Treasure: west from the first Beacon of Droknar, in a round room full of beetles and mushrooms, in the southern end of the little pond.
Rewards[ | ]
When opened, Arachni's Spoils spawns 1 item for each player (2 in Hard Mode).
- Items rewards may be:
- A Unique item exclusive to this chest:
- A gold item
- Weapons exclusive to this reward chest:
- Rare crafting materials
- A Mantis Dreamweaver Polymock Piece
- Completing the dungeon also rewards Asuran reputation points: 1500 (2250 in Hard Mode) for a first time completion and half the points for repeats.
Notes[ | ]
- Beware of the poison spouts and jets. Flag heroes & henchmen past them and/or try to time things so that you can cross when they are less active.
- Another obtainable unique item from this dungeon is The Matriarch's Stinger, which Spider Matriarchs drop. These are found on level 1 and 2.
- Completing the dungeon requires killing hundreds of foes, who end up dropping more loot than most characters can comfortably carry. Be prepared to salvage, drop, or use a Mercantile Summoning Stone.
- There is no need to carry the Asura Flame Staff; one is always located close to where they are required.
- At the 2nd Spider Matriarch, heroes may get stuck between the right set of spider eggs and the wall.
- Part of the second floor of the dungeon is very similar to the second floor of Vloxen Excavations
- The flame traps on level 2 can be disabled by killing the Flame Guardian.