Marvin17254@legacy41699581 (talk | contribs) m (→Resources and External Links: pvx: to w:c:pvx: using AWB) |
Ilr8038@legacy41691019 (talk | contribs) m (→Assn Builds: --Feb25th Changes: Perma SF no longer requires Glyph -&- New Tactics build added--) |
||
| Line 102: | Line 102: | ||
|<div style="background:#DC5C5C"> '''Assassin/Dervish''' |
|<div style="background:#DC5C5C"> '''Assassin/Dervish''' |
||
|<div style="background:#DC5C5C"> '''"Perma SF" Asn''' |
|<div style="background:#DC5C5C"> '''"Perma SF" Asn''' |
||
| − | |<div style="background:#DC5C5C"> ''' |
+ | |<div style="background:#DC5C5C"> '''Assassin/Warrior''' |
! <!-- for show/hide to align in the last column--> |
! <!-- for show/hide to align in the last column--> |
||
|- |
|- |
||
|<div style="background:#DC5C5C">[[Shadow Arts|Sha]]:12 (+4) [[Wind Prayers|Wind]]:10 <br> |
|<div style="background:#DC5C5C">[[Shadow Arts|Sha]]:12 (+4) [[Wind Prayers|Wind]]:10 <br> |
||
{{scalable skill bar|30px|Harrier's Haste|Dark Escape|Feigned Neutrality|Death's Charge|Deadly Paradox|Heart of Shadow|Fleeting Stability|Shadow Form}} <!-- ASSN/DERV from PVX, might need to be confirmed --> |
{{scalable skill bar|30px|Harrier's Haste|Dark Escape|Feigned Neutrality|Death's Charge|Deadly Paradox|Heart of Shadow|Fleeting Stability|Shadow Form}} <!-- ASSN/DERV from PVX, might need to be confirmed --> |
||
| − | |<div style="background:#DC5C5C">[[ |
+ | |<div style="background:#DC5C5C">[[|]]:? [[Shadow Arts|Sha]]:12(+4) [[Deadly Arts|Dea]]:3<br> |
| − | {{scalable skill bar|30px| |
+ | {{scalable skill bar|30px|Optional|Dark Escape|Shadow Sanctuary|Death's Charge|Deadly Paradox|Dwarven Stability|"I Am Unstoppable!"|Shadow Form}} <!-- EDIT NOTE: From PvX, ...have also personally Dual-Ran with one, worked fine --> |
| − | |<div style="background:#DC5C5C">[[|]]: |
+ | |<div style="background:#DC5C5C">[[Tactics|Tactics]]:12 [[Shadow Arts|Sha]]:12 [[|]]:?<br> |
| + | {{scalable skill bar|30px|"To the Limit!"|Soldier's Speed|Dash|"I Am Unstoppable!"|Shroud of Distress|Heart of Shadow|Death's Charge|Shadow Form}} <!-- Ref'd from: http://www.guildwarsguru.com/forum/can-perma-sfs-still-run-t10431073.html --> |
||
| − | {{scalable skill bar|30px|Optional|Optional|Optional|Optional|Optional|Optional|Optional|Optional}} <!-- NONE/UNOCCUPIED, suggestions welcome --> |
||
|} </div> |
|} </div> |
||
Revision as of 20:00, 22 March 2010

|

|

|
| Before proceeding, be sure to Read: Droknar's Forge run in the PvE Glossary for Advice, Warnings, and related Info on this Run |
...There are no pictures that accurately capture the epic nature of the "Drok's Run". And even the enlarged maps below fail to portray its sheer monumental scope. Likewise, its full completion is not simply a matter of "cut & pasting" a random running build from some website... The run itself can be just as much "Mental" as it is physical. ...Button mashing and poor timing are often the worst enemies encountered throughout this run for any over-eager novice hoping to divulge an easy method to the finish line. The only guaranteed path is that of discipline, preparedness, and practice.
A new runner may also want to first stock up on Consumables(especially Debt-removal ones) as they're likely to suffer just as many set-backs in the last 2 parts of the run to Camp Rankor, as they experienced in the first part of the run.
| Expanded Hazard Key |
|---|
| Conditions: |
| Enchantment stripping: |
| Slowing Hexes: |
| Knockdowns: |
Section-2, Lornar's Pass run

"Imps":
Hazards: →![]() →
→![]()
![]() →
→![]()
![]()
Welcome to the opening portion of Droknar's run, where a newbie runner is often tempted to focus their build around Hex countering, only to realize later on that this is the only portion of the run where those nasty little Ice Imps actually appear. Unfortunately this is also what makes or breaks most running builds, because if you can't make it out of your Driveway, you definitely won't make it to Town.
The natural impulse here is to stop and "psyche one's self up" for the run, but that can prove fatal if that hesitation gives the Avicara patrol to the South-East enough time to stagger up your driveway. There's also the danger of more than 1 Barbed Trap being planted by the very first Pinesoul just below you. So don't hesitate, Get movin!
Once you've made it past the field of Imps and the first 2 indentations on the right-side wall, you'll come to what looks like a safe shoulder. However this is not true for there are atleast two Wurms hidden somewhere within it. Be prepared by activating your Knockdown protection before you rest here.

the Gulch:
Hazards: →![]()
![]() →
→![]()
![]()
![]() →
→![]()
![]() →
→![]()
![]() This is one of the only portions of the run that requires perfect timing. But fortunately, it's also very close to the start of the run, making it that much more accessible. And lots of practice will be necessary as it has the largest variety of threats seen throughout the entire run.
This is one of the only portions of the run that requires perfect timing. But fortunately, it's also very close to the start of the run, making it that much more accessible. And lots of practice will be necessary as it has the largest variety of threats seen throughout the entire run.
The first of which is the fact that you have almost no time to "set up" for these threats because as soon as you reach this point, you're already being chased by Wurms while a patrol of Imps may be heading straight for you. Once you've dodged them however, you are immediately confronted by the only other groups of Avicara seen on this run (or atleast until Talus Chute that is). ...And they can really put the hurt on any runnner that didn't have the time or option to activate the rest of their defenses.
After powering through this first group of hard-hitting "birds", there can often be a second group spaced just enough apart to ensure that you're again given no-time to stop. This normally wouldn't be so bad, except that just beyond them, is the first real group of Golems and "Trees" who make escaping "the Gulch" (down the middle of it) a real challenge. This is where hugging the East side of the path is crucial because hitting a Barbed Trap all but guarantees failure if the Avicara are still chasing you. And reaching the next section after this will be largely determined by your ability to out-run the hordes of Grawl in the small valley below.
- Tip: Players needing to reapply enchants can rest just beyond this first group of Pinesouls. ...And players who rely on a crippling skill like Veil of Thorns, must stop here until it wears off to avoid being
 Plague Signet'ed by Crones.
Troll Cave:
Hazards: →![]() →
→![]() →
→![]() ("Lag")
There are several different methods for squeezing through a tiny chokepoint in a cave that is often no more than "2-mobs-wide". The first of which is by not engaging those mobs in the first place, (Hence the popularity of Assassin Shadow-Steps in most Droks runner builds over the last 2 years). But there are also other methods such as anticipating their movements while also anticipating "Lag". Maintaining 33% movement speed or better via stacking Run-Buffs is generally the easiest way to achieve this and is highly recommended for any Non- Assassin runner in this situation. With enough practice at it, an experienced runner can read the Lag and "get there" before it even occurs. ...Just don't be in too much of a rush to leave the cave because a Wurm is often waiting just beyond it.
("Lag")
There are several different methods for squeezing through a tiny chokepoint in a cave that is often no more than "2-mobs-wide". The first of which is by not engaging those mobs in the first place, (Hence the popularity of Assassin Shadow-Steps in most Droks runner builds over the last 2 years). But there are also other methods such as anticipating their movements while also anticipating "Lag". Maintaining 33% movement speed or better via stacking Run-Buffs is generally the easiest way to achieve this and is highly recommended for any Non- Assassin runner in this situation. With enough practice at it, an experienced runner can read the Lag and "get there" before it even occurs. ...Just don't be in too much of a rush to leave the cave because a Wurm is often waiting just beyond it.
- A runner with the right Crippling skill can "draw out" the Trolls, snare them, and then safely maneuver around them.

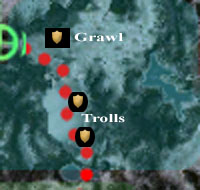
Wurm Pass:
Hazards: →![]()
![]() →
→![]() →
→![]()
When running this portion, it is crucial to keep your Knockdown Protection up until you've completely cleared this stretch. This also makes timing the run very important if your KD protection is Enchant-based because the Crones patrolling this stretch will strip it right off again.
Starting off at the bridge, you can hug the South edge of the path and avoid the first Grawl patrol almost entirely. Getting past the next patrol can be trickier but carefully timing the use of your KD protection can be a big help. Once you're beyond this portion, you can safely let the KD protection lapse. (assuming you don't require its use to counter ![]() Water Tridents)
Water Tridents)

Grenth's Hill:
Hazards: →![]()
![]() →
→![]() →
→![]()
![]() →
→![]() →
→![]() ("Lag")
("Lag")
Much like the first portion, this final stretch can be deceptive or work against your normal impulses. ...Standing at the bottom and looking straight up it reveals none of the massive clusters of Grawl and Golems waiting near the top of it. And you won't know exactly which side they're on until you're already running for your life, so you must be quick on your feet and shift sides on-the-fly. Runners here must also avoid going anywhere near the groups of Pinesouls as running over a single Barbed Trap leads to being instantly overrun. And if any of the Pinesouls are positioned in front of the final chokepoint (in front of the huge Tree and adjacent to the large rock), then you may need to take a detour all the way around them.
Section-3, Dreadnaught's Drift

"Drift":
Hazards:→![]() →
→![]() →
→![]()
![]() →
→![]()
Immediately upon entering the zone, there will be a Stone Summit Patrol closing in on you from above. This is often makes it impossible for anyone to run a Survivor-title candidate to Droks. (See the PvE glossary-split Talk page for a possible work-around). Fortunately the west side of the round-about only has 1 group of Summit and they're easy to run through as long as they don't spawn with multiple Scouts(Pin Down). The only real danger is in the rest of your party trying to follow you, thus dragging their Aggro further down the road while you're trying to set up for the next portion.

"Dread":
Hazards: →![]() (Stomp)
(Stomp)
In this second portion, a runner gets a taste of the Tundra Giants that will be dominating the trail for the next 4 subsections. And it's a rather foul taste if your only KD protection is in Enchantment-form and you forget to apply it before getting near these Giants. Even though these Giants are technically warriors, they attack from long range with a significant I.A.S. boost, giving them very high Damage per Second.
- One of the best counters to Tundra Giants, is Damage reduction enchantments or insignias
Section-4, Snake Dance run

"Troll Dance":
Hazards: →![]() ("Lag") →
("Lag") →![]() (Stomp)
(Stomp)
As brutal as the Knockdowns were in the last Area, they can't compare with those in this Area. And the gaps between these mobs where you can rest and regain energy are fleeting at best so it is recommended that any runner attempting the next 2 stretches; focus on timing and reaching those rest-spots before the wandering Patrols do. The first such instance is in passing the first small group of Giants heading up the path before they can merge with the much larger group at the end of the first climb.
And failing to totally clear these first two portions without a death means navigating through a ton of Trolls who later leave the cave to the west and pour onto the main trail.

Giant's Peak:
Hazards: →![]() (Stomp) →
(Stomp) →![]()
Near the middle of the next climb, there should have been space off-to the shoulder for you to rest and regain energy. After this point there won't be another resting place until you loop around the wide turn ahead and get three-quarters from the summit with a patrol closing in fast. This point is where +Energy gear or buffs from consumables really makes a difference because there is no where to run but forwards once you step onto the summit. However if you're lucky, there may be some Deldrimor Dwarves towards the back that will distract some of the Giants for you.
The biggest challenge here is simply remembering to maintain all of your defenses, speed boosts, and Knockdown protection. Upon clearing this huge open area, you may already be too low on energy to make it any further, but there are typically a few smaller safe-spots off to the right side just before the last 2 groups of Giants. Beyond them is a nice clear path to the rez shrine with a small chokepoint that appears to be solid rock, but can actually be tread right over

Azure Plain:
Hazards: →![]() (Stomp) →
(Stomp) →![]()
This next portion is deceptively barren and that's what makes it dangerous as larger and larger groups of Azure Shadows (Smiting nightmares) pop up and use a Signet that ignores Armor and anti-casting Elites while also causing knockdown. At this point, if you have any members in your party, you should zig-zag down the tight eastern path and make a B-line for the neighboring explorable-area of Grenth's Footprint to avoid having to restart all the way at the beginning of this Area again. The stretch beyond this small path is fairly easy but can be complicated by the fact that you must get set-up for the hardest portion of the entire run at the end of it. There may also be a danger of body-blocking on the last switch-back path right before the huge groups of Trolls ahead. ...In any case, constantly maintain your Knockdown protection and don't let it lapse until you're right next to their camp site.

the Snake's Maw:
Hazards: →![]()
![]() →
→![]() →
→![]() ("Lag") →
("Lag") →![]() (Stomp) →
(Stomp) →![]()
Even with a perfect Crippling skill, it is almost impossible to stave off all the Trolls near this cave's mouth while avoiding being surrounded by them. So any runner without a Shadow Step must have perfect timing for the next 30 seconds of this portion. For starters, [this cave is even more narrow] in some areas than the last cave was.
In addition to already being chased by a dozen Trolls, there will be a boss-spawn of Trolls inside the south end of the cave that often includes Ice Golems who will bypass any hex-prevention skills you could be carrying, by directly applying a "slowing hex" with ![]() Frozen Burst (PbAoE targeted) as you attempt to run by them. If you give any of them time to start running towards you, it's probably already too late so you need to already be at maximum running speed by the time you enter their aggro-radius. "Lag Anticipation" is also typically required to slip through this point.
Frozen Burst (PbAoE targeted) as you attempt to run by them. If you give any of them time to start running towards you, it's probably already too late so you need to already be at maximum running speed by the time you enter their aggro-radius. "Lag Anticipation" is also typically required to slip through this point.
Once past this point, it's a simple matter of avoiding a few more Troll armies and just maintaining KD protection as you run past some small groups of Griffons and Summit Giant Herders that are only accompanied by Dolyak Masters. This is made even easier by the fact that they'll be too busy fighting with eachother to notice a single runner.
- Camp Rankor lies dead ahead and allows the party size to be increased by atleast 2 more members for the final stretch to Drok's Forge.
Section-5, Talus Chute run
Hazards: →![]()
![]() →
→![]()
![]()
![]() →
→![]()
Talus Chute is rather unique in that the middle half of it has no enemies at all, while the 100 or so feet before and-after the first rez-Shrine at the start has atleast 1000ft'.s worth of mobs all living together, including the largest Avicara spawn you're likely to find anywhere, and up to 3 pop-up mobs right above them.
Needles to say, this Cluster F-bomb of co-habitation can present a real problem for any runner with just-average Armor or defenses. One of the easier methods for overcoming this short but brutal spot is to add a couple warrior - Heroes & Henchmen with "Incoming!"/"Fall Back!" or "Charge!" to your party before leaving the outpost, and have them accompany you as "high speed power bait" to draw some of the fire.
Once you get beyond the large Rock, you shouldn't be pestered by anything else until the large valley converges back into a gulch with a few more Avicara, Trolls, or Grawl down the middle of it. ...and finally after that, a clean final-stretch to the gates of Droknar's.
Build ideas and Run-Tested Builds
Assassin/Dervish
|
"Perma SF" Asn
|
Assassin/Warrior
|
|
| Dervish/Monk | Dervish/Assassin | (build pending) | ||||||||||||||||||||||||
| Earth:12 Wind:6(+1) Mys:11(+2) |
Earth:10 Wind:10 Mys:10 |
[[|]]:? [[|]]:? [[|]]:? |
| "Bold" Warrior | Warrior / Mez | (build pending) | ||||||||||||||||||||||||
| Str:12(+1) Tac:12(+2) |
Str:12(+2) Tac:12(+1) Dom:3 |
[[|]]:? [[|]]:? [[|]]:? |
Ranger / Monk
|
Ranger / Derv
|
(build pending)
|
||||||||
[[|]]:? [[|]]:? [[|]]:? |
Additional Notes
Trivia
- When approaching Beacon's Perch from Lornar's Pass, the entrance doors always appear shut, but never actually are.
- While elaborately detailed, the Shrine to Grenth serves little purpose other than Buying Morale Boosts, because of its location.
- Full exploration of the entire 'run' with the right build can net nearly 7% towards the Cartographer title
- The linear distance from Beacon's Perch to Camp Rankor is roughly four-times that of the distance from Rankor to Droknar's Forge itself. Yet despite this, many "Pro runners" split the cost straight down the middle between each destination.
Resources and External Links
- Additional running builds can be found at [[PvX]] .
There are many "Drok's Run" demonstration videos available on YouTube™, including a HARDMODE version:
The most popular builds for running to Droknar's Forge are listed below:
These two are less used, and *may* or may-not work anymore.