Crasher17446@legacy41699648 (talk | contribs) (→Notes) |
(→Notes: I followed the advice and brought 2 unnecessarily skills when i vanq'd this area. I corrected the tip) |
||
| (24 intermediate revisions by 13 users not shown) | |||
| Line 1: | Line 1: | ||
| + | {{LocationInfo |
||
| − | {{location box |
||
| ⚫ | |||
| − | |image=[[Image:Diessa Lowlands 1000x800.jpg|200px]] |
||
| − | + | | campaign = Prophecies |
|
| ⚫ | |||
| ⚫ | |||
| + | | pixels = 175297 |
||
| ⚫ | |||
| + | | neighbors = Ascalon Foothills; Flame Temple Corridor; Grendich Courthouse; Nolani Academy (outpost); The Breach |
||
| − | |neighbors=[[Grendich Courthouse]], [[The Breach]],<br />[[Ascalon Foothills]], [[Nolani Academy (location)|Nolani Academy]],<br />[[Flame Temple Corridor]] |
||
| + | | services = Collector |
||
| − | |map=[[Image:Diessa-Lowlands.jpg|200px|Map of Diessa Lowlands]] |
||
| + | }}{{Zaishen_Quest}} |
||
| − | }} |
||
==General Information== |
==General Information== |
||
| ⚫ | Being north of the Great Northern Wall, the [[Diessa Lowlands]] have been overrun by gargoyles and charr. Only small strongholds at the old [[Grendich Courthouse]] and [[Nolani Academy]] provide safety for those attempting to travel through to the Shiverpeaks. At the center of the area, the Charr have fortified their position and thus should be avoided by all but the strongest and swiftest. Rock golems await those entering from the southeastern pass, while gargoyles mingle with charr along the west. A large tar pit infested with devourers can be found in the northeast and slows passage to anyone planning on exploring the [[Flame Temple Corridor]]. In spite of the danger, many choose to run or fight through this zone towards the [[Ascalon Foothills]] to reach the Shiverpeaks. Others may choose to help defend the besieged Academy to bypass this zone altogether. |
||
| − | Region: [[Ascalon]] |
||
| + | ==Exits== |
||
| − | '''General Description:'''<br> |
||
| ⚫ | Being north of the Great Northern Wall, |
||
| − | === |
+ | ===Towns and Outposts=== |
| + | *[[Grendich Courthouse]] (north) |
||
| ⚫ | |||
| + | *[[Nolani Academy]] (southwest) |
||
| ⚫ | |||
| − | *South-East: [[The Breach]] |
||
| − | ===[[Town]]s=== |
||
| − | *[[image:OutpostIcon_sml.png]] [[Grendich Courthouse]] |
||
| − | *[[image:MissionIcon_sml.png]] [[Nolani Academy]] |
||
| + | ===Explorable areas=== |
||
| ⚫ | |||
| ⚫ | |||
| ⚫ | |||
| + | *[[The Breach]] (Southeast) |
||
| + | |||
| ⚫ | |||
*Ruins of [[Nolani]] |
*Ruins of [[Nolani]] |
||
*[[Historical Monument of Nolani]] |
*[[Historical Monument of Nolani]] |
||
| − | == |
+ | ==NPCs== |
| − | *Ghost of |
+ | *[[Althea|Ghost of Althea]] |
| − | ===[[Collector]]s=== |
||
| ⚫ | |||
| ⚫ | |||
| ⚫ | |||
| ⚫ | |||
| − | == |
+ | ===Collectors=== |
| ⚫ | |||
| ⚫ | |||
| ⚫ | |||
| − | *{{mo}} [[Draw Conditions]] from [[Rif Telourau]] (not available before [[Copperhammer Mines]]). |
||
| ⚫ | |||
| − | *{{me}} [[Hex Breaker]] from [[Ignis Phanaura]] (not available before [[Eye For Profit]] quest at [[Druid's Overlook]]). |
||
| ⚫ | |||
==[[Monster]]s== |
==[[Monster]]s== |
||
*[[Charr]] |
*[[Charr]] |
||
| + | **{{w}}6 (23) [[Charr Blade Warrior]] |
||
| − | {| {{STDT}} |
||
| + | **{{w}}6 (23) [[Charr Axe Warrior]] |
||
| − | |- |
||
| + | **{{w}}8 (23) [[Charr Blade Storm]] |
||
| − | !style="background-color: {{W-color|background}}" | {{W}} || style="background-color: {{R-color|background}}" | {{r}} || style="background-color: {{Mo-color|background}}" | {{Mo}} || style="background-color: {{N-color|background}}" | {{N}} || style="background-color: {{Me-color|background}}" | {{Me}} || style="background-color: {{E-color|background}}" | {{E}} |
||
| + | **{{w}}8 (23) [[Charr Axe Fiend]] |
||
| − | |- |
||
| + | **{{r}}6 (23) [[Charr Stalker]] |
||
| − | | style="background-color: {{W-color|background}}" | [[Charr Blade Warrior]] Lv 6<br> [[Charr Axe Warrior]] Lv 6<br>[[Charr Blade Storm]] Lv 8<br>[[Charr Axe Fiend]] Lv 8 |
||
| − | + | **{{r}}8 (23) [[Charr Hunter]] |
|
| − | + | **{{mo}}5 (23) [[Charr Martyr]] |
|
| + | **{{mo}}7 (23) [[Charr Shaman]] |
||
| − | | style="background-color: {{N-color|background}}" | [[Charr Ash Walker]] Lv 6<br>[[Charr Ashen Claw]] Lv 8 |
||
| + | **{{n}}6 (23) [[Charr Ash Walker]] |
||
| − | | style="background-color: {{Me-color|background}}" | [[Charr Mind Spark]] Lv 6<br>[[Charr Chaot]] Lv 8 |
||
| + | **{{n}}8 (23) [[Charr Ashen Claw]] |
||
| − | | style="background-color: {{E-color|background}}" | [[Charr Fire Caller]] Lv 6<br>[[Charr Flame Wielder]] Lv 8 |
||
| + | **{{me}}6 (23) [[Charr Mind Spark]] |
||
| − | |} |
||
| + | **{{me}}8 (23) [[Charr Chaot]] |
||
| + | **{{e}}6 (23) [[Charr Fire Caller]] |
||
| + | **{{e}}8 (23) [[Charr Flame Wielder]] |
||
*[[Gargoyle (Species)|Gargoyle]]s: |
*[[Gargoyle (Species)|Gargoyle]]s: |
||
| + | **{{mo}}2 (22) [[Resurrect Gargoyle]] |
||
| − | **[[Resurrect Gargoyle]]s {{Mo}} Lvl 2 (22) |
||
| + | **{{me}}8 (23) [[Shatter Gargoyle]] |
||
| − | **[[Shatter Gargoyle]]s {{Me}} Lvl 8 (23) |
||
| − | ** |
+ | **{{e}}7 (23) [[Flash Gargoyle]] |
*[[Devourer]]s: |
*[[Devourer]]s: |
||
| + | **{{w}}8 (23) [[Carrion Devourer]] |
||
| − | **[[Carrion Devourer]]s {{W}} Lvl 8 (23) |
||
| − | ** |
+ | **{{r}}7 (23) [[Whiptail Devourer]] |
| − | ** |
+ | **{{n}}8 (23) [[Plague Devourer]] |
*[[Elemental]]s: |
*[[Elemental]]s: |
||
| + | **{{w}}7 (23) [[Boulder Elemental]] |
||
| − | **[[Boulder Elemental]]s {{W}} Lvl 7 (23) |
||
| + | **{{w}}5 (22) [[Stone Elemental]] |
||
| − | **[[Stone Fury|Stone Furies]] |
+ | **{{e}}8 (23) [[Stone Fury|Stone Furies]] |
| − | **[[Stone Elemental]]s {{e}} Lvl 5 (22) |
||
*[[Rider]]s: |
*[[Rider]]s: |
||
| − | **[[Storm Rider]] |
+ | **{{me}}7 (23) [[Storm Rider]] |
*[[Plant]]s: |
*[[Plant]]s: |
||
| − | **[[Singed Oak]] |
+ | **{{r}}10 (24) [[Singed Oak]] |
*[[Hydra]] |
*[[Hydra]] |
||
| − | **[[Hydra (Ascalon)|Hydra]] |
+ | **{{e}}10 (24) [[Hydra (Ascalon)|Hydra]] |
| − | === |
+ | ===Bosses=== |
*[[Gargoyle (Species)|Gargoyle]]s: |
*[[Gargoyle (Species)|Gargoyle]]s: |
||
| − | **[[Rif Telourau]] |
+ | **{{mo}}9 (27) [[Rif Telourau]] ([[Draw Conditions]] not available before [[Copperhammer Mines]]) |
| − | **[[Spasmo Thunderbolt]] |
+ | **{{e}}9 (27) [[Spasmo Thunderbolt]] |
| − | **[[Ignis Phanaura]] |
+ | **{{mo}}9 (27) [[Ignis Phanaura]] ([[Hex Breaker]] not available before [[Eye For Profit]] quest at [[Druid's Overlook]]) |
*[[Elemental]]s: |
*[[Elemental]]s: |
||
| − | **[[Clob Stonearch]] |
+ | **{{mo}}11 (27) [[Clob Stonearch]] |
| − | **[[Drub Slingstone]] |
+ | **{{r}}11 (27) [[Drub Slingstone]] |
| − | **[[Igmon Quivcaver]] |
+ | **{{me}}11 (27) [[Igmon Quivcaver]] |
| − | **[[Mallet Runecolumn]] |
+ | **{{e}}11 (27) [[Mallet Runecolumn]] |
| − | **[[Pulv Rubblegrinder]] |
+ | **{{w}}11 (27) [[Pulv Rubblegrinder]] |
| − | **[[Slog Bloodsplatter]] |
+ | **{{n}}11 (27) [[Slog Bloodsplatter]] |
*[[Charr]] |
*[[Charr]] |
||
| − | **[[Maim Deathrain]] |
+ | **{{r}}9 (27) [[Maim Deathrain]] |
| ⚫ | |||
| − | **[[Lumps Ruinator]] {{W}} Lvl 9 |
||
| − | **[[Cruc the Reborn]] |
+ | **{{mo}}9 (27) [[Cruc the Reborn]] |
| − | **[[Smuuz the Unfeeling]] |
+ | **{{n}}9 (27) [[Smuuz the Unfeeling]] |
| − | **[[Smoke Kindlefist]] |
+ | **{{e}}9 (27) [[Smoke Kindlefist]] |
| − | **[[Phang the Deceiver]] |
+ | **{{me}}9 (27) [[Phang the Deceiver]] |
| − | **[[Garfazz Bloodfang ( |
+ | **{{n}}10 [[Garfazz Bloodfang (boss)|Garfazz Bloodfang]] (only during quest [[Garfazz Bloodfang (quest)|Garfazz Bloodfang]]) |
==Notes== |
==Notes== |
||
| − | *To receive credit for the [[Vanquisher]] title track in Diessa Lowlands you must defeat |
+ | *To receive credit for the [[Vanquisher]] title track in Diessa Lowlands you must defeat 342-387 monsters in [[Hard Mode]]. |
| − | * |
+ | **Because this is a fairly difficult area to vanquish with 4 people, consider bringing a larger party from [[Yak's Bend]] (6 party members) or [[Temple of the Ages]] (8 party members). |
| − | *The quest [[Then and Now, Here and There]] from Eye of the North can make vanquishing this area easier as there are fewer [[Charr]] to deal with. There are about 292 monsters. |
+ | **The quest [[Then and Now, Here and There]] from Eye of the North can make vanquishing this area easier as there are fewer [[Charr]] to deal with. There are about 292 monsters with this quest active. |
| + | **A [[minion master]] can help to make up the difference in party size when vanquishing by providing additional body blocking and damage. |
||
| − | *If a hydra runs out of the area when you are near the [[Flame Temple Corridor]], you may not be able to completely vanquish the area. |
||
| + | *A single enchantment removal skill in your party will be enough for this vanquish. |
||
| − | [[Category:Ascalon]] |
||
| + | |||
| ⚫ | |||
| + | {{Prophecies Explorable Areas}} |
||
| + | |||
| ⚫ | |||
| + | |||
| + | [[de:Tiefland von Diessa]] |
||
Latest revision as of 05:35, 12 April 2012
| Diessa Lowlands | ||||||||||
|---|---|---|---|---|---|---|---|---|---|---|

| ||||||||||
| Explorable area | ||||||||||
| ||||||||||
| Map | ||||||||||
|

This article has an associated Zaishen Challenge Quest.
General Information[ | ]
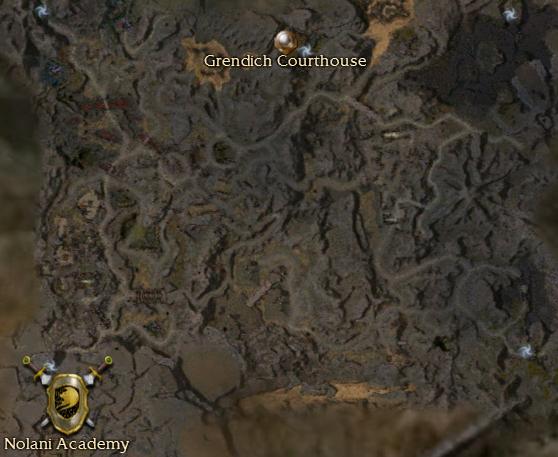
Being north of the Great Northern Wall, the Diessa Lowlands have been overrun by gargoyles and charr. Only small strongholds at the old Grendich Courthouse and Nolani Academy provide safety for those attempting to travel through to the Shiverpeaks. At the center of the area, the Charr have fortified their position and thus should be avoided by all but the strongest and swiftest. Rock golems await those entering from the southeastern pass, while gargoyles mingle with charr along the west. A large tar pit infested with devourers can be found in the northeast and slows passage to anyone planning on exploring the Flame Temple Corridor. In spite of the danger, many choose to run or fight through this zone towards the Ascalon Foothills to reach the Shiverpeaks. Others may choose to help defend the besieged Academy to bypass this zone altogether.
Exits[ | ]
Towns and Outposts[ | ]
- Grendich Courthouse (north)
- Nolani Academy (southwest)
Explorable areas[ | ]
- Ascalon Foothills (Northwest)
- Flame Temple Corridor (Northeast)
- The Breach (Southeast)
Points of Interest[ | ]
- Ruins of Nolani
- Historical Monument of Nolani
NPCs[ | ]
Collectors[ | ]
Monsters[ | ]
- Charr
 6 (23) Charr Blade Warrior
- 6 (23) Charr Axe Warrior
- 8 (23) Charr Blade Storm
- 8 (23) Charr Axe Fiend
- 6 (23) Charr Stalker
- 8 (23) Charr Hunter
- 5 (23) Charr Martyr
- 7 (23) Charr Shaman
- 6 (23) Charr Ash Walker
- 8 (23) Charr Ashen Claw
- 6 (23) Charr Mind Spark
- 8 (23) Charr Chaot
- 6 (23) Charr Fire Caller
- 8 (23) Charr Flame Wielder
- Gargoyles:
- 2 (22) Resurrect Gargoyle
- 8 (23) Shatter Gargoyle
- 7 (23) Flash Gargoyle
- Devourers:
- 8 (23) Carrion Devourer
- 7 (23) Whiptail Devourer
- 8 (23) Plague Devourer
- Elementals:
- 7 (23) Boulder Elemental
- 5 (22) Stone Elemental
- 8 (23) Stone Furies
- Riders:
- 7 (23) Storm Rider
- Plants:
- 10 (24) Singed Oak
- Hydra
- 10 (24) Hydra
Bosses[ | ]
- Gargoyles:
- 9 (27) Rif Telourau (Draw Conditions not available before Copperhammer Mines)
- 9 (27) Spasmo Thunderbolt
- 9 (27) Ignis Phanaura (Hex Breaker not available before Eye For Profit quest at Druid's Overlook)
- Elementals:
- 11 (27) Clob Stonearch
- 11 (27) Drub Slingstone
- 11 (27) Igmon Quivcaver
- 11 (27) Mallet Runecolumn
- 11 (27) Pulv Rubblegrinder
- 11 (27) Slog Bloodsplatter
- Charr
- 9 (27) Maim Deathrain
- 9 (27) Lumps Ruinator (Shield Stance not available before Dropping Eaves quest at Ettin's Back)
- 9 (27) Cruc the Reborn
- 9 (27) Smuuz the Unfeeling
- 9 (27) Smoke Kindlefist
- 9 (27) Phang the Deceiver
- 10 Garfazz Bloodfang (only during quest Garfazz Bloodfang)
Notes[ | ]
- To receive credit for the Vanquisher title track in Diessa Lowlands you must defeat 342-387 monsters in Hard Mode.
- Because this is a fairly difficult area to vanquish with 4 people, consider bringing a larger party from Yak's Bend (6 party members) or Temple of the Ages (8 party members).
- The quest Then and Now, Here and There from Eye of the North can make vanquishing this area easier as there are fewer Charr to deal with. There are about 292 monsters with this quest active.
- A minion master can help to make up the difference in party size when vanquishing by providing additional body blocking and damage.
- A single enchantment removal skill in your party will be enough for this vanquish.