Bassman1949@legacy41684517 (talk | contribs) (→Bonus) |
Randomtime (talk | contribs) (→Bonus: commenting out, going to wikify) |
||
| Line 64: | Line 64: | ||
If you don't have Factions and hence don't have ritualist skills, you can replace Razah with a human healer to hold the east bombard and use the same strategy, but that obviously requires a second player to get master's reward with this strategy. |
If you don't have Factions and hence don't have ritualist skills, you can replace Razah with a human healer to hold the east bombard and use the same strategy, but that obviously requires a second player to get master's reward with this strategy. |
||
| − | + | <!--The above mentioned information is very good advice and also very helpful. I got the bonus without any problems by placing two Whispers groups by the East Bombard and one group by the Center Bombard. Luckily, I had a true Restoration Ritualist Hero to help out at the East Bombard and Olias the Necromancer as well. (It does help to have good runes and weapons for your heroes.) I sent Master of Whispersto to help out at the Center Bombard. I assigned him to have a Ritualist secondary profession and also used him to make minions. I tried to give him as equal skill points as possible in Death Magic, Restoration Magic and Soul Reaping. It did help to have a Superior Death Magic Rune for the Master of Whispers as it helped with the skill point spread. I did this mission with my Elementalist (I used Fire Magic) and my Dervish using the same technique. For henchmen I used one healer, one fighter, one Dervish and Odurra the Mesmer. (She does Domination Magic and not Illusion Magic. Yes, she is mislabeled.) |
|
| − | one warrior |
+ | one warrior--> |
== Creatures == |
== Creatures == |
||
Revision as of 09:33, 28 December 2007
This is a mission entry. For information on the mission outpost Dzagonur Bastion, see Dzagonur Bastion (outpost).
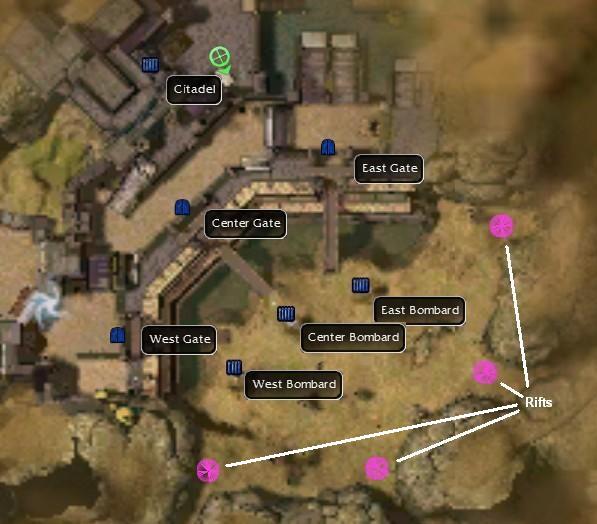
Dzagonur Bastion mission map (zoomed to show detail)
Mission Objectives and Rewards
Master of Whispers must be in your party to enter this mission.
If your character chose to follow Margrid the Sly (after the primary quest Mysterious Message) and has not yet gained Master of Whispers, you can still enter this mission (after completing the primary quest Greed and Regret) by partying with another player who can bring him. It is not necessary to complete the Dasha Vestibule mission, but it must be available.
Objectives
Defeat the Margonite Generals before their forces take the citadel. Preserve the perimeter bombards to aid you in the battle. Defend the gates to prevent enemy forces from reaching the Citadel.
- Speak to Prince Ahmtur the Mighty.
- # of 3 gates still stand.
- # of 3 bombards still function.
- # of 4 generals still remain.
- *BONUS* Keep the bastion's defenses intact.
- # of 6 defenses left intact.
Rewards
Reward Defenses XP Gold Skill Points Standard 0 1,000 100 1 Expert's 1 - 4 1,500 150 1 Master's 5 - 6 2,000 200 1 Hard mode Standard 0 1,000 200 1 Expert's 1 - 4 2,000 300 1 Master's 5 - 6 3,000 500 1
Walkthrough
This mission can be very confusing and doesn’t seem to have a clear explanation anywhere of what is going on and what you’re supposed to do. When you start the mission, you’ll be next to Ahmtur. Talk to him and he’ll open a portal to start the mission in earnest.
Down below, there are three bombards, three gates, and three disciples of secrets, each accompanied by three vabbian guards. You can talk to a disciple of secrets and tell him which side to defend, and he’ll take his three accompanying guards with him to stand next to the bombard you choose. There is an additional group of three vabbian guards in front of the center bombard, which you cannot move elsewhere.
Shortly after the mission starts, mobs will start coming. The mobs generally consist of groups of three kournans and one margonite. Each group will run to a bombard and try to destroy it. Bombards can be captured by standing near them, with each character of a side granting one pip of bombard ownership movement. Characters of opposite sides can cancel each other out. The net change in bombard ownership rate cannot exceed four pips.
The bombards start out entirely allied with you. Kournans will try to make them neutral, and then try to capture them. If they fully capture a bombard, it will be destroyed and you cannot recapture it. You can recapture a bombard at any time if it has not been fully captured by the Kournans. Bombards supply substantial fire support at nearby enemies until they are destroyed, but they can’t really defend themselves against capture without allies there to help.
If Kournans destroy a bombard, they will head on to the corresponding gate, which is captured in the same manner as bombards. If they capture this, it opens a path into the bastion. The mobs will move into the bastion and try to capture it as well. Capturing it is much slower than capturing gates or bombards, but if they capture it, you fail the mission. If Ahmtur dies, the mission is failed.
The initial phase of the mission is easy: several groups of four mobs will come down and attack a bombard. They’re slow enough that they’re easy to fight off. Each group will target a fixed bombard/gate entry. If one gate is completely breached and the group is set to target a different one, it will still take the time to attack the relevant bombard or gate rather than rushing into the bastion.
After the several initial groups of mobs are dead, four margonite bosses will spawn at four fixed locations, out of range of the bombards. Each boss is accompanied by three margonites, and more importantly, a rift. The rift will periodically spawn groups of three Kournans, which come down to attack the corresponding bombard. A rift is closed when its corresponding boss is killed, at which point additional mobs no longer spawn from it. Kill all four bosses to complete the mission.
A boss cannot be pulled while a corresponding bombard its groups head toward is still intact. Once the bombard is destroyed, the boss will come down to the bombard, but stay away from the gate. Once the gate is destroyed, the boss will head into the bastion to help capture it.
If you only want to beat the mission and don’t care about master’s reward, then assign a whispers group to each bombard. Help them out in the initial waves of mobs, but once the bosses spawn, abandon them to hold out as long as they can before dying, while you go kill bosses. Kill the elementalist boss to the far east first, then work your way westward. If a boss isn’t there when you arrive, his corresponding bombard is down, so you’ll have to go there or into the bastion to chase him down and kill him. The last boss will almost certainly be gone by the time you get there.
Bonus
If you want master’s reward without having other players to group with, it helps immensely to have a ritualist hero (whom I'll call Razah, though you can substitute Xandra or some other hero with ritualist as a secondary profession). If you don’t have one and took Master of Whispers rather than Margrid so that you need to finish this mission to continue, a ritualist secondary hero with 12 points in restoration can work.
Your party should consist of Razah, Master of Whispers, and a party of six that is reasonably well balanced when excluding the first two heroes. Set the ritualist as a restoration ritualist with recuperation, life, a couple healing spells (spirit light weapon is good), and whatever else you like. Set up Master of Whispers with some melee minions, blood of the master, and well of blood. Ranged minions are bad, as they will trigger whirling defense and possibly kill your NPC allies. The rest of the party can be anything that you feel comfortable fighting Kournans and margonites with as a group of six, without help from Master of Whispers or the ritualist.
Assign all three whispers groups to defend the east bombard, and flag Razah and Master of Whispers over there as well. Put them a little to the east of the east bombard, with Master of Whispers right about where the guards you send over there stand, and Razah slightly behind him. You want any mobs that come to get attacked by both Master of Whispers and the NPC allies. The positioning here is a little finicky, so you may take a few tries to get it right, or you may have to reflag them during a mission if it becomes clear that you messed up their position. If Master of Whispers dies, you flagged him too far ahead of the NPC allies. If the NPCs die, you flagged Master of Whispers too far behind them.
The minions taking damage and Razah healing both them and the guards is enough to hold the east bombard indefinitely. You can then ignore the east bombard and have your group of six run around worrying about the rest of the mission.
In the initial waves, kill the mobs that head toward the center or west bombards. The last group will run toward the guards in the center. Kill the rest of the group, but leave the two bowmen for the guards. Run to the far west where the warrior boss spawns so that you can start attacking the boss as soon as he spawns. The guards can handle two bowmen on their own.
As soon as the warrior boss spawns, your group of six should focus fire on him to kill him as quickly as possible. He’ll heal himself with healing signet when he gets low on life, so it helps to have a skill interrupt to stop this, or better yet, disable it with distracting shot. As soon as the boss dies, retreat to the west bombard, perhaps even past the bombard to make sure that henchmen follow.
Margonites that were with the boss may or may not follow you; if they don’t, you can ignore them for the rest of the mission as they’ve basically taken themselves out of the fight. Kill whatever mobs do follow you with help from the bombards, and you may need to run back and forth between the center and west bombards to hold on to both. Be sure to target the priests, as they can greatly slow down your efforts at killing the mobs. If there’s no real risk of losing a bombard, it may be good to help out the guards in front of the center bombard as well.
Once the situation is under control and the center and west bombards are fully recaptured and clear of Kournans, go attack the monk boss which is a little east of the boss you already killed. As before, focus fire on the boss until it is dead, and then retreat to the bombards. Again, kill any mobs that follow and fully recapture the center and west bombards as necessary.
Once the bombards are secure with two bosses dead, finishing off the mission is actually pretty easy. Go kill the paragon boss which is to the east of the monk boss, focusing fire on the boss as before. Once the boss is dead, retreat to the center bombard. The west bombard will be secure, with the first two bosses dead. Once you finish off any mobs that follow, the center bombard will be secure as well. Go kill the elementalist boss to the far east at your leisure to complete the mission. Killing the boss ends the mission, without needing to kill any mobs accompanying it.
If you don't have Factions and hence don't have ritualist skills, you can replace Razah with a human healer to hold the east bombard and use the same strategy, but that obviously requires a second player to get master's reward with this strategy.
Creatures
NPCs
Monsters
- Kournan military
 16, 20 Kournan Guard
- 16, 20 Kournan Bowman
- 16, 20 Kournan Priest
- 16, 20 Kournan Oppressor
- Margonites
Bosses
- 28 General Doriah: Magehunter's Smash
- 28 General Nimtak: Spell Breaker
- 28 General Tirraj: Invoke Lightning
- 28 General Kumtash: Anthem of Guidance
Follow-Up
- Upon completion of the mission players will find themselves in: The Kodash Bazaar.
- To continue the storyline, take on the following Primary Quest: Pledge of the Merchant Princes, from Zerai the Learner in Kodash Bazaar.