Crasher17446@legacy41699648 (talk | contribs) No edit summary |
m (→Layout: And Corrupted Isle is in between the desolation and RoT, and Isle of Wurms is in between Kourna and the Desolation, and Isle of Solitude between Kourna and Vabbi...) |
||
| Line 9: | Line 9: | ||
==Layout== |
==Layout== |
||
| − | There are two caves on either side of the hall, leading to a long bridge, which then leads to a small central island. From this island, there are stairs that lead down onto a large lake, which connects to another island, with a huge structure and a [[Flag stand]] on it. On the left cave, there is a statue of either The Great Dwarf or Droknar (both statues look alike) |
+ | There are two caves on either side of the hall, leading to a long bridge, which then leads to a small central island. From this island, there are stairs that lead down onto a large lake, which connects to another island, with a huge structure and a [[Flag stand]] on it. On the left cave, there is a statue of either The Great Dwarf or Droknar (both statues look alike). |
==Features== |
==Features== |
||
Revision as of 03:49, 14 April 2008
| Frozen Isle | ||||||
|---|---|---|---|---|---|---|
| ||||||
| Basic Info | ||||||
| ||||||
| Neighbor(s) | ||||||
| None | ||||||
| Map | ||||||
 (click to enlarge) | ||||||
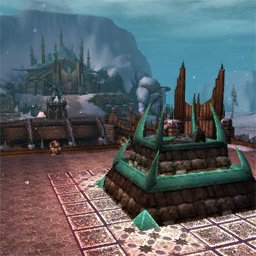
The Frozen Isle is a Guild Hall, first introduced in Guild Wars Prophecies.
Layout
There are two caves on either side of the hall, leading to a long bridge, which then leads to a small central island. From this island, there are stairs that lead down onto a large lake, which connects to another island, with a huge structure and a Flag stand on it. On the left cave, there is a statue of either The Great Dwarf or Droknar (both statues look alike).
Features
- Winter mountain theme, looks like the Shiverpeak Mountains
- Complex pathing between bases
- Gates controlled by lock switches located at the map's center
- Ice causes Icy Ground causing a pause for 1 second followed by slowed movement if you stop on it
NPCs
Both teams start with several NPCs.
Strategy
Easily one of the biggest, this map is a split paradise. Winning here depends on finding the right balance between defending and attacking. The guild halls are very open, allowing small split team attackers to kill NPCs with ease, unless countered by a defense split. Usually battles on this map feature 2 simultaneous fights: One at the flagstand and one between the split teams (which might take place in either of the guild halls or the bridge in between), but even more than 2 areas might see fighting at once. The gate control mechanism at the center of the map enables those controlling it to either shut out enemies or trap them in the center of the map.
Aptly so, icy ground covers the Frozen Isle. A player who stops on the ice moves 70% slower for five seconds. Since the effect always wears out naturally and nothing can remove it, knocking the opponent's flag runner down on the ice could secure a morale boost.
| Guild Halls | 
|
| Warrior's Isle • Hunter's Isle • Wizard's Isle • Frozen Isle • Nomad's Isle • Druid's Isle • Isle of the Dead • Burning Isle • Isle of Weeping Stone • Isle of Meditation • Imperial Isle • Isle of Jade • Uncharted Isle • Corrupted Isle • Isle of Wurms • Isle of Solitude |