This is a mission entry. For information on the mission outpost Grand Court of Sebelkeh, see Grand Court of Sebelkeh (outpost).
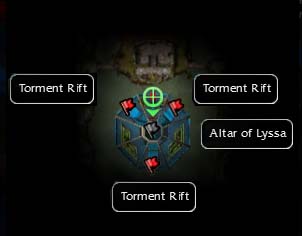
Grand Court of Sebelkeh Mission map
Mission Objectives & Rewards
Tahlkora must be in your party to enter this mission.
Objectives
The Altar of Lyssa must not be captured by The Blasphemy.
- Capture the torment rifts guarded by the Margonites. Stand near a rift to claim it. # of 3 rifts captured.
Rewards
The rewards for this mission are based on how quickly you complete the mission.
Reward Mission Completion Time XP Gold Skill Points Standard > 9 minutes 1,000 100 1 Expert's 6 - 9 minutes 1,500 150 1 Master's < 6 minutes 2,000 200 1 Hard mode Standard > 16 minutes 1,000 200 1 Expert's 12 - 16 minutes 2,000 300 1 Master's < 12 minutes 3,000 500 1
Primary
The Sebelkeh Basilica is laid out in circular fashion, with the Altar of Lyssa at the center and three platforms branching off to the south, northwest, and northeast. On each of these platforms is a group of 7 Margonites, a Torment Claw, and a Torment Rift. You must capture all three of these Torment Rifts, without losing the Altar of Lyssa, to complete the mission.
Securing the Altar
When the mission begins, you will be in a teleportation circle at the end of a narrow passage directly north of the Altar of Lyssa. As soon as any party member leaves this circle (including heroes/henchmen), the mission timer will start and the first wave of Margonites will trigger. (Parties should thus make sure that all human players have loaded before moving.) A total of six Margonites, two from each of the three Rifts, will rush the Altar and begin capturing it. The party must position themselves near enough to the Altar to cancel this capturing effect - 8 party members can easily override 6 Margonites - and then kill off the Margonites.
When you have killed both of the Margonites that came from a certain Rift, a second pair from that Rift will trigger and move towards the Altar. A good strategy would be to kill only one Margonite from each pair in the first wave, then kill off the remaining three one at a time, waiting after each one to take out the second-wave pair that will come rushing in.
The Blasphemy
After you have survived both waves of Margonites, The Blasphemy will begin to spawn. It will appear at a random rift and move to the Altar; once there, it will use Summon Torment to "jump-start" capturing it. While The Blasphemy is capturing the Altar, you will be unable to cancel its effect on the Altar's capture bar - it will be in a permanent "+1" state until you kill The Blasphemy.
The Blasphemy has very low armor/hit points and is easy to kill, but when it dies, it casts the Last Rites of Torment hex on all party members and 3 Unbound Energies will spawn from its corpse. The Unbound Energies are also easy to kill, and are especially vulnerable to cold damage and Lightbringer's Gaze, but because of their quick attack rate combined with Last Rites of Torment, they will wreak havoc on the party while they live.
The Blasphemy will respawn after a short delay when you kill it; this delay decreases with each Torment Rift you capture. Be careful not to kill The Blasphemy while there are still Unbound Energies around from the last time you killed it.
Sometimes, The Blasphemy will not go to the Altar, but instead to a Rift you have already captured and attempt to re-open it. This can complicate the mission somewhat and make it more difficult to achieve the Master's Reward, especially if it does this while you are capturing the final Rift, as all three Rifts must be 100% captured to complete the mission. However, it can also be advantageous - simply set one hero to Avoid Combat and plant his/her flag next to that Rift. This will cancel The Blasphemy's effect on the Rift's capture bar, and you won't have to kill The Blasphemy until after you have captured both other Rifts.
Capturing the Rifts
Ignore The Blasphemy when it first spawns and move to capture one of the Chaos Rifts. It will be guarded by three Margonites and a Torment Claw, all of which you must kill; otherwise, even a single one will be able to re-open the Rift after you have left. It is very beneficial to have the entire party move near the rift (but away from the Claw) so you can begin capturing it while you are killing the enemies.
The Torment Claws use the Torment Slash skill, which can be very devastating if the party is bunched in front of the Claw; however, since the Claws are stationary, casters and ranged attackers can simply avoid the Claws entirely. The skill is also very easy to interrupt, due to its long activation time.
After you have captured the Rift and killed all of its defenders, go back to the Altar and kill The Blasphemy and the Unbound Energies that spawn. After you have completely re-captured the Altar, go capture the second Rift. Kill The Blasphemy at the Altar again, then go to capture the last Rift. With only one Rift remaining, The Blasphemy will respawn almost immediately, but you should again ignore it and focus on capturing the Rift. You will have to kill the Blasphemy and its spawns one last time before the mission is actually completed.
It is NOT necessary for the blue bars to fill up completely for a Chaos Rift to be considered captured. In fact, trying to do so will certainly cost you the Masters level and probably the Experts level as well. However, it will make it harder for the Blasphemy or a lone Margonite to recapture the Rift.
Tips
- Lightbringer's Gaze is very useful in this mission, as all enemies are vulnerable to it. With the exception of healers, everyone should be equipping this skill and using it during the mission – it will make getting masters easier. (Remember to display the Lightbringer title before the start of the mission.)
- Last Rites of Torment can be removed from the entire party quickly using Inspired Hex (or Revealed Hex) - since Last Rites is a monster skill, IH will not be replaced with it and will instantly recharge; IH also pays for itself in energy gain with only 2 points in Inspiration Magic. Two players using IH can cleanse the party of Last Rites in ~5 seconds, less than half of its duration. Anyone not using skills from their secondary profession is advised to switch to */Me and bring IH to remove Last Rites from themselves.
- Doing this mission alone with only Heroes and Henchmen can seem very daunting, however, if you have 3 Healing Monks in the party (one Hero, 2 Henchmen) and focus on killing the Margonite Clerics first, the difficulty goes down considerably. Taking Acolyte Sousuke and Zhed Shadowhoof with a Searing Flames build, you stand a good chance of making Masters in a single attempt as well.
- Three monks are not required here if you don't aggro (i.e. if you run to the center at the beginning and wage the first phase of the fight there); two will do. The mission is time-critical if you want the Master's reward, and in that case, you want as much firepower as possible.
- For masters, trying using the group: Acolyte Sousuke (fire), Zhed (fire), Tahlkora (protection), Mhenlo, Herta, Devona, and Gehraz. This should work (with a small variation depending on your class) for everyone. Capture the center, then take everyone to one of the rifts, cap it, retake center (Lightbringer's gaze helps a lot against the Unbound Energies), then take everyone to the next rift, repeat. As long as capturing the center at the very beginning doesn't take too long, you should get masters with time to spare.
- Consider using Resurrection Signets or Sunspear Rebirth Signets instead of the typical resurrection spells because you get a morale boost every time you capture a rift.
- If you are of caster class, note that the Margonite Clerics use Spell Breaker quite often so it may be important to consider bringing melee heroes or henchmen, or use spells that have Area of Effect to counter the effect.
- Bringing minions is ill-advised, as they will kill the Blasphemy on sight and activate Last Rites of Torment
- If you're playing solo, a good way to save time is to flag someone to capture a Rift the moment the capturing starts, while the rest of the party moves off to capture the next Rift. Using this method and recalling flagged Heroes once they're done, it is possible to complete this solo in 4 minutes.
Creatures
Monsters
Follow-up
- Upon completion of the mission players will find themselves in: The Kodash Bazaar.
- To continue the storyline, take on the following Primary Quest: Attack at the Kodash.
Notes
- Once you finish this mission, the Garden of Seborhin will transform into the Nightfallen Garden. This means that any quests that require you to enter the Garden of Seborhin will not be available and cannot be completed until you complete the game (and it transforms back).
| Nightfall Campaign Missions | |
| Chahbek Village → Jokanur Diggings → Blacktide Den → Consulate Docks → Venta Cemetery → Kodonur Crossroads → Rilohn Refuge, Pogahn Passage → Moddok Crevice → Tihark Orchard → Dzagonur Bastion, Dasha Vestibule → Grand Court of Sebelkeh → Jennur's Horde, Nundu Bay → Gate of Desolation → Ruins of Morah → Gate of Pain → Gate of Madness → Abaddon's Gate |