Crasher17446@legacy41699648 (talk | contribs) (→Notes) |
m (→Notes) |
||
| (24 intermediate revisions by 10 users not shown) | |||
| Line 1: | Line 1: | ||
| ⚫ | |||
| − | {{Location_Info|title=Sunjiang District}} |
||
| − | {{ |
+ | {{Location Explorable info|title=Sunjiang District}} |
| + | {{Zaishen Quest}} |
||
| ⚫ | |||
==Objectives == |
==Objectives == |
||
| Line 8: | Line 8: | ||
Prevent Shiro from summoning his spirit army! |
Prevent Shiro from summoning his spirit army! |
||
* Locate Shiro in the sewers. |
* Locate Shiro in the sewers. |
||
| − | * '''ADDED:''' Destroy the [[Spirit Rift (environmental feature)|spirit rifts]] to remove Shiro's protective shield. |
+ | * '''ADDED:''' Destroy the [[Spirit Rift (environmental feature)|spirit rifts]] to remove Shiro's protective shield. 4...0 [[Spirit Rift (environmental feature)|spirit rifts]] remaining. |
* [[Master Togo]] must survive |
* [[Master Togo]] must survive |
||
* [[Mhenlo]] must survive |
* [[Mhenlo]] must survive |
||
| Line 23: | Line 23: | ||
==Walkthrough== |
==Walkthrough== |
||
| + | ===Primary=== |
||
| − | The main objective of this mission is to destroy the four [[Spirit Rift (environmental feature)|spirit rifts]] that [[Shiro]] has opened to summon an army of [[Shiro'ken]]. Each of these rifts is guarded by a [[Spirit of Portals]], which must be destroyed to close the rift. Shiro'ken will periodically spawn from the rift while it is open (a different profession at each one), so you should focus on destroying the Spirit as quickly as possible. The ritualist skills [[Consume Soul]] and [[Gaze of Fury]] can be used on the Spirits, destroying them instantly |
+ | The main objective of this mission is to destroy the four [[Spirit Rift (environmental feature)|spirit rifts]] that [[Shiro]] has opened to summon an army of [[Shiro'ken]]. Each of these rifts is guarded by a [[Spirit of Portals]], which must be destroyed to close the rift. Shiro'ken will periodically spawn from the rift while it is open (a different profession at each one), so you should focus on destroying the Spirit as quickly as possible. The ritualist skills [[Consume Soul]] and [[Gaze of Fury]] can be used on the Spirits, destroying them instantly. The mesmer skill [[Spiritual Pain]] is also very useful against the Spirits. |
At the beginning of the mission, you will be given the [[Spear of Archemorus]] and the [[Urn of Saint Viktor]]; they function in exactly the same way as when you first used them in [[Boreas Seabed]] and [[Arborstone]]. You can complete the mission without bringing either of them along, though they obviously do help. The high damage from a fully charged Spear of Archemorus is especially helpful against the Spirits, as they have increased resistance to both physical and elemental damage compared to normal spirits. |
At the beginning of the mission, you will be given the [[Spear of Archemorus]] and the [[Urn of Saint Viktor]]; they function in exactly the same way as when you first used them in [[Boreas Seabed]] and [[Arborstone]]. You can complete the mission without bringing either of them along, though they obviously do help. The high damage from a fully charged Spear of Archemorus is especially helpful against the Spirits, as they have increased resistance to both physical and elemental damage compared to normal spirits. |
||
| Line 29: | Line 30: | ||
A bridge will come down and the mission will start, there will be two groups of [[Afflicted]] followed by an area with large metal vents. These are called [[flame fissure]]s and they will cause [[burning]] and [[cripple]] to anyone who passes over them. At the end of that area will be the first spirit rift, spawning [[Shiro'ken Assassin]]s. |
A bridge will come down and the mission will start, there will be two groups of [[Afflicted]] followed by an area with large metal vents. These are called [[flame fissure]]s and they will cause [[burning]] and [[cripple]] to anyone who passes over them. At the end of that area will be the first spirit rift, spawning [[Shiro'ken Assassin]]s. |
||
| − | After destroying the rift, |
+ | After destroying the rift, proceed to the right. you will come to a high ledge from which you can see Shiro suspended inside a spirit rift himself; he cannot be targeted or damaged. Past this area there will be a few groups of Afflicted with a path splitting to the north and to the east. To the east will be the second spirit rift, spawning [[Shiro'ken Ranger]]s and surrounded by a couple groups of Afflicted. Careful [[aggro]] is necessary here to deal with the multiple groups, and the area is dotted with [[stalagmite spike]]s that cause [[bleeding]] and crippling. Taking each group individually makes the fight easier. Be careful about line of sight issues here, as the awkward terrain often induces henchmen and heroes to shoot the ground, and thus do no damage. |
Continuing north on the main path, you will come to the third spirit rift atop a small hill (which looks like a gargantuan [[kappa]] shell), this time spawning [[Shiro'ken Necromancer]]s. The hill is surrounded with [[poison]]ed water, and there is a group of Afflicted which patrols through the area. |
Continuing north on the main path, you will come to the third spirit rift atop a small hill (which looks like a gargantuan [[kappa]] shell), this time spawning [[Shiro'ken Necromancer]]s. The hill is surrounded with [[poison]]ed water, and there is a group of Afflicted which patrols through the area. |
||
| Line 35: | Line 36: | ||
The fourth and final spirit rift is to the west, past a few more groups of Afflicted. [[Shiro'ken Warrior]]s will spawn from the rift, and the plates in this area cause the [[dazed]] condition, so casters should be careful. |
The fourth and final spirit rift is to the west, past a few more groups of Afflicted. [[Shiro'ken Warrior]]s will spawn from the rift, and the plates in this area cause the [[dazed]] condition, so casters should be careful. |
||
| − | After the fourth rift is closed, a [[cutscene]] will play, after which you will be in the central area (where Shiro was) facing four Shiro'ken [[boss]]es. Immediately after the cutscene ends, you should move back into the left corner so that you can pull one or two bosses at a time. The mission is complete when all four have been destroyed. |
+ | After the fourth rift is closed, a [[cutscene]] will play, after which you will be in the central area (where Shiro was) facing four Shiro'ken [[boss]]es. Either the [[Warrior's Construct]] or [[Assassin's Construct]] will be in front, either the [[Necromancer's Construct]] or [[Elemental's Construct]] to the left, either the [[Ranger's Construct]] or [[Mesmer's Construct]] to the right, and either the [[Monk's Construct]] or [[Ritualist's Construct]] in back. Immediately after the cutscene ends, you should move back into the left corner so that you can pull one or two bosses at a time. The mission is complete when all four have been destroyed. |
| + | |||
| + | ===Master's reward=== |
||
| + | The allowed 20 minutes are ample time for master's reward. If you run short on time, a lot of time can be saved by assassinating a Spirit of Portals and then running away, without killing the afflicted in the area. |
||
| + | |||
| + | ===Hard mode=== |
||
| + | Even without increasing the time limit for hard mode, a group would have plenty of time for master's reward. The increased time limit to 25 minutes is far more than even a slow group should need. |
||
| + | |||
| + | It is useful to avoid melee henchmen, as they are liable to run off and aggro extra bosses at the end. Melee heroes or players are easier to keep back as needed. |
||
| + | |||
| + | At the eastern portal, pull the first group of [[Afflicted]] far away before killing them. The [[Afflicted Ritualist]] will try to stay back to heal and resurrect. If you run up to it, you'll aggro a second group, and if you try to shoot it from a distance without pulling, awkward terrain makes it so that heroes will just shoot the ground and not do any damage. |
||
| + | |||
| + | After the cut scene, flag your party into the corner, pull the necromancer/elementalist boss, and the ranger/mesmer boss will stay put. If you pull the warrior/assassin boss first, the necromancer/elementalist and ranger/mesmer bosses will also come. If the monk boss spawns, it will step up to heal no matter what else you pull, which would mean fighting all four bosses at once if you try to pull the warrior/assassin boss first. The ritualist boss will stay back on the first pull if it spawns, which makes things easier. If you have any melee characters, keep them back by having them attack the warrior/assassin boss after you pull, so that they don't go aggro any extra bosses. |
||
==Creatures== |
==Creatures== |
||
| Line 41: | Line 54: | ||
===NPCs=== |
===NPCs=== |
||
*{{mo}}20 [[Brother Mhenlo]] |
*{{mo}}20 [[Brother Mhenlo]] |
||
| − | *{{rt}}20 [[Master Togo]] |
+ | *{{rt}}20 [[Master Togo|Togo]] |
===Monsters=== |
===Monsters=== |
||
| Line 61: | Line 74: | ||
**{{x}}24 [[Spirit of Portals]] |
**{{x}}24 [[Spirit of Portals]] |
||
| − | ===Bosses |
+ | ===Bosses - elite skill captures=== |
| ⚫ | |||
| − | After the cutscene you will have to kill 4 boss Constructs, random spawn. The Constructs each use an [[elite skill]]. However, the mission will end immediately after the death of the last boss killed: |
||
| ⚫ | |||
| − | |||
| − | *{{ |
+ | *{{mo}}24 [[Monk's Construct]] - [[Life Sheath]] |
| − | *{{ |
+ | *{{n}}24 [[Necromancer's Construct]] - [[Soul Bind]] |
| − | *{{ |
+ | *{{me}}24 [[Mesmer's Construct]] - [[Psychic Distraction]] |
| − | *{{ |
+ | *{{e}}24 [[Elemental's Construct]] - [[Mirror of Ice]] |
| − | *{{ |
+ | *{{a}}24 [[Assassin's Construct]] - [[Temple Strike]] |
| − | *{{ |
+ | *{{rt}}24 [[Ritualist's Construct]] - [[Soul Twisting]] |
| ⚫ | |||
| ⚫ | |||
| − | |||
| ⚫ | Since only 4 of the 8 |
||
==Dialogues== |
==Dialogues== |
||
| Line 84: | Line 93: | ||
==Notes== |
==Notes== |
||
*The [[Spear of Archemorus]] and the [[Urn of Saint Viktor]] spawn at the opening of the mission alongside the team. They are provided as assistance, the party may use them or leave them. |
*The [[Spear of Archemorus]] and the [[Urn of Saint Viktor]] spawn at the opening of the mission alongside the team. They are provided as assistance, the party may use them or leave them. |
||
| − | * |
+ | *You can approach [[Shiro Tagachi]] in the center area before closing the rifts. He will not attack, but he is also [[Invulnerable]]. |
| ⚫ | |||
| − | *If you try to attack him an error message will be displayed informing you that "Shiro Tagachi is invulnerable." |
||
| − | *Although Shiro is invulnerable, any undead minions a party member may be controlling will try to attack him, and it will be impossible to move them away. |
||
| − | *The Ritualist skill [[Gaze of Fury]] and Elite Skill [[Consume Soul]] will instantly destroy the Portal Spirits, which can come in very handy. |
||
| ⚫ | |||
| − | |||
| − | ==Bugs== |
||
*There is an error in the text displayed during the cutscene. Master Togo says "us" but the text reads "up". |
*There is an error in the text displayed during the cutscene. Master Togo says "us" but the text reads "up". |
||
*At the end of the mission, it is stated that both the Spear of Archemorus and the Urn of Saint Viktor were destroyed, when in fact, they both can be seen if a player is holding the items, or is dropped on the floor near the cutscene area, within camera view. |
*At the end of the mission, it is stated that both the Spear of Archemorus and the Urn of Saint Viktor were destroyed, when in fact, they both can be seen if a player is holding the items, or is dropped on the floor near the cutscene area, within camera view. |
||
| ⚫ | *Since only 4 of the 8 constructs spawn at the very end of the mission, it is best to capture their skills in their alternate locations. The first six bosses can be found in [[Sunjiang District (explorable)]] ''after'' completion of the mission. (Before completion, they will be in the last area sectioned off). The Assassin's Construct can be found in [[Silent Surf]] and the Ritualist's Construct can be found in [[Morostav Trail]]. Still, if you wish to capture during the final fight, make sure your party does not kill the boss from whom you want to cap last. |
||
| − | *Sometimes Spear of Archemorus may duplicate itself. |
||
| + | {{bug|If somehow the 4th spirit dies after you have failed the mission (and have not returned to the outpost) your party will be resurrected for the construct fight, however completing the fight this way will not cause you to complete the mission, instead you will simply be stuck.}} |
||
| ⚫ | |||
| ⚫ | |||
| − | [[Category:Bugs]] |
||
[[Category:Factions_missions]] |
[[Category:Factions_missions]] |
||
| + | [[de:Sunjiang-Bezirk (Mission)]] |
||
Latest revision as of 21:33, 6 May 2011
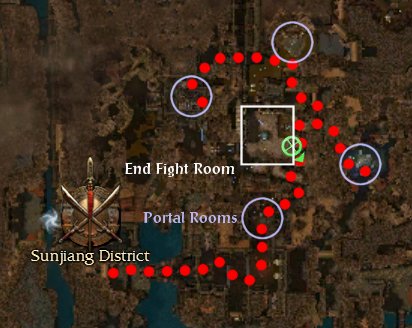
Map of Sunjiang District (mission)
This is a mission entry. For information on the mission outpost Sunjiang District, see Sunjiang District (outpost). For information on the explorable area Sunjiang District, see Sunjiang District (explorable).

This article has an associated Zaishen Challenge Quest.
Objectives[ | ]
This mission requires the completion of the quest Battle in the Sewers, obtained from Emperor's Hand in the Raisu Pavilion.
Prevent Shiro from summoning his spirit army!
- Locate Shiro in the sewers.
- ADDED: Destroy the spirit rifts to remove Shiro's protective shield. 4...0 spirit rifts remaining.
- Master Togo must survive
- Mhenlo must survive
- ADDED: Defeat Shiro's constructs.
Rewards[ | ]
Reward Mission completion time XP Gold Skill Points Standard > 25 minutes 1,000 100 1 Expert's 20-25 minutes 1,500 150 1 Master's < 20 minutes 2,000 200 1 Hard mode Standard > 30 min 1,000 200 1 Expert's 25-30 min 2,000 300 1 Master's < 25 min 3,000 500 1
Walkthrough[ | ]
Primary[ | ]
The main objective of this mission is to destroy the four spirit rifts that Shiro has opened to summon an army of Shiro'ken. Each of these rifts is guarded by a Spirit of Portals, which must be destroyed to close the rift. Shiro'ken will periodically spawn from the rift while it is open (a different profession at each one), so you should focus on destroying the Spirit as quickly as possible. The ritualist skills Consume Soul and Gaze of Fury can be used on the Spirits, destroying them instantly. The mesmer skill Spiritual Pain is also very useful against the Spirits.
At the beginning of the mission, you will be given the Spear of Archemorus and the Urn of Saint Viktor; they function in exactly the same way as when you first used them in Boreas Seabed and Arborstone. You can complete the mission without bringing either of them along, though they obviously do help. The high damage from a fully charged Spear of Archemorus is especially helpful against the Spirits, as they have increased resistance to both physical and elemental damage compared to normal spirits.
A bridge will come down and the mission will start, there will be two groups of Afflicted followed by an area with large metal vents. These are called flame fissures and they will cause burning and cripple to anyone who passes over them. At the end of that area will be the first spirit rift, spawning Shiro'ken Assassins.
After destroying the rift, proceed to the right. you will come to a high ledge from which you can see Shiro suspended inside a spirit rift himself; he cannot be targeted or damaged. Past this area there will be a few groups of Afflicted with a path splitting to the north and to the east. To the east will be the second spirit rift, spawning Shiro'ken Rangers and surrounded by a couple groups of Afflicted. Careful aggro is necessary here to deal with the multiple groups, and the area is dotted with stalagmite spikes that cause bleeding and crippling. Taking each group individually makes the fight easier. Be careful about line of sight issues here, as the awkward terrain often induces henchmen and heroes to shoot the ground, and thus do no damage.
Continuing north on the main path, you will come to the third spirit rift atop a small hill (which looks like a gargantuan kappa shell), this time spawning Shiro'ken Necromancers. The hill is surrounded with poisoned water, and there is a group of Afflicted which patrols through the area.
The fourth and final spirit rift is to the west, past a few more groups of Afflicted. Shiro'ken Warriors will spawn from the rift, and the plates in this area cause the dazed condition, so casters should be careful.
After the fourth rift is closed, a cutscene will play, after which you will be in the central area (where Shiro was) facing four Shiro'ken bosses. Either the Warrior's Construct or Assassin's Construct will be in front, either the Necromancer's Construct or Elemental's Construct to the left, either the Ranger's Construct or Mesmer's Construct to the right, and either the Monk's Construct or Ritualist's Construct in back. Immediately after the cutscene ends, you should move back into the left corner so that you can pull one or two bosses at a time. The mission is complete when all four have been destroyed.
Master's reward[ | ]
The allowed 20 minutes are ample time for master's reward. If you run short on time, a lot of time can be saved by assassinating a Spirit of Portals and then running away, without killing the afflicted in the area.
Hard mode[ | ]
Even without increasing the time limit for hard mode, a group would have plenty of time for master's reward. The increased time limit to 25 minutes is far more than even a slow group should need.
It is useful to avoid melee henchmen, as they are liable to run off and aggro extra bosses at the end. Melee heroes or players are easier to keep back as needed.
At the eastern portal, pull the first group of Afflicted far away before killing them. The Afflicted Ritualist will try to stay back to heal and resurrect. If you run up to it, you'll aggro a second group, and if you try to shoot it from a distance without pulling, awkward terrain makes it so that heroes will just shoot the ground and not do any damage.
After the cut scene, flag your party into the corner, pull the necromancer/elementalist boss, and the ranger/mesmer boss will stay put. If you pull the warrior/assassin boss first, the necromancer/elementalist and ranger/mesmer bosses will also come. If the monk boss spawns, it will step up to heal no matter what else you pull, which would mean fighting all four bosses at once if you try to pull the warrior/assassin boss first. The ritualist boss will stay back on the first pull if it spawns, which makes things easier. If you have any melee characters, keep them back by having them attack the warrior/assassin boss after you pull, so that they don't go aggro any extra bosses.
Creatures[ | ]
NPCs[ | ]
 20 Brother Mhenlo
 20 Togo
Monsters[ | ]
Bosses - elite skill captures[ | ]
- 24 Warrior's Construct - Hundred Blades
- 24 Ranger's Construct - Equinox
- 24 Monk's Construct - Life Sheath
- 24 Necromancer's Construct - Soul Bind
- 24 Mesmer's Construct - Psychic Distraction
- 24 Elemental's Construct - Mirror of Ice
- 24 Assassin's Construct - Temple Strike
- 24 Ritualist's Construct - Soul Twisting
Dialogues[ | ]
Follow-up[ | ]
- Upon completion of the mission players will find themselves in: Maatu Keep
- To continue the storyline, take one of the following Primary Quests from Jamei: Journey to Cavalon or Journey to House zu Heltzer.
Notes[ | ]
- The Spear of Archemorus and the Urn of Saint Viktor spawn at the opening of the mission alongside the team. They are provided as assistance, the party may use them or leave them.
- You can approach Shiro Tagachi in the center area before closing the rifts. He will not attack, but he is also Invulnerable.
- Beware, after the cut scene when you kill the last portal, heroes/henchmen will try to run into the middle of the four Bosses - ensuring certain mission failure. Be ready to (very) quickly flag your heroes back. This appears to only happen in hard mode for some reason.
- There is an error in the text displayed during the cutscene. Master Togo says "us" but the text reads "up".
- At the end of the mission, it is stated that both the Spear of Archemorus and the Urn of Saint Viktor were destroyed, when in fact, they both can be seen if a player is holding the items, or is dropped on the floor near the cutscene area, within camera view.
- Since only 4 of the 8 constructs spawn at the very end of the mission, it is best to capture their skills in their alternate locations. The first six bosses can be found in Sunjiang District (explorable) after completion of the mission. (Before completion, they will be in the last area sectioned off). The Assassin's Construct can be found in Silent Surf and the Ritualist's Construct can be found in Morostav Trail. Still, if you wish to capture during the final fight, make sure your party does not kill the boss from whom you want to cap last.
| Factions Campaign Missions | 
|
| Minister Cho's Estate → Zen Daijun → Vizunah Square → Nahpui Quarter → Tahnnakai Temple → Arborstone → Boreas Seabed → Sunjiang District → The Eternal Grove, Gyala Hatchery → Unwaking Waters → Raisu Palace → Imperial Sanctum |