Overview[ | ]
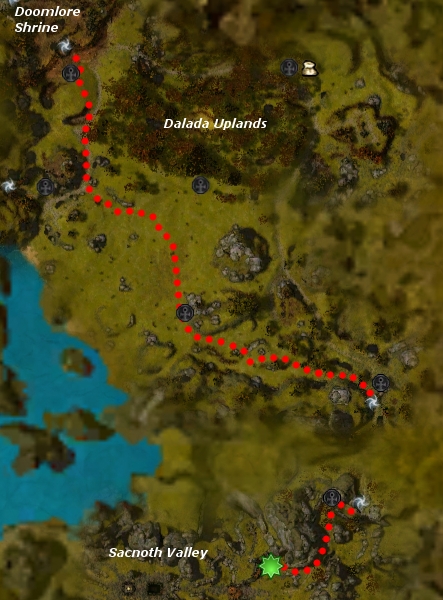
Quest map beginning from Doomlore Shrine
Summary
- Meet Anton in Sacnoth Valley.
- Find and defeat Rend Ragemauler.
- Defeat Rend Ragemauler's guards. You have killed 0...9 of 9 guards.
- See Captain Langmar for your reward.
Obtained from
Requirements
Reward
- 150 Vanguard reputation points
- Anton joins your party
Dialogue
- "Here we are engaged in battle for our very survival, and Anton goes off on a quest for personal vengeance. I will have his hide for this! And by all accounts, Rend Ragemauler is a threat we would have to deal with. We shall help Anton with his vendetta. Then we can turn his attention to other things. Anton is searching Sacnoth Valley for his quarry. Find him and bring this ugly matter to a close."
- Accept: "One less Charr, one more Charr fighter. Win-win!"
- Reject: "Rage... fading, fading. Ahhh. What did you say?"
Intermediate Dialogue 1
- Anton: "Ahh... here you are again. You have the persistence of a jade scarab searching for a dark recess to lay its eggs."
- Anton: "Well, you have proved useful in the past. Come. The time for revenge is at hand."
- Anton: "You have stood by me, <name>, so you should know the truth of the matter."
- Anton: "When the Charr attacked Ascalon, I made a deal with the invaders in return for the lives of my friends and family. I provided Rend Ragemauler useful information."
- Anton: "I was caught in my traitorous actions, and that is why I was in prison when Surmia fell."
- Anton: "I returned to my village to find bodies stacked as high as huts. Ragemauler had betrayed me."
- Anton: "I am not the noble soldier Langmar thinks: I am a fool and a traitor. I have paid for my mistakes with the blood of my family and of my friends."
- Anton: "I cannot change what I have done, nor can I forgive myself. I can only seek vengeance for those who died because of my folly."
- Anton: "One way or another, my rage shall finally be sated."
Intermediate Dialogue 2
- Anton: "Rend Ragemauler!"
- Anton: "I lived, and now it is time for you to face my justice!"
Intermediate Dialogue 3
- Rend Ragemauler: "I yield, meat! I surrender! Let us strike a deal!"
- Anton: "I know too well of your deals. Focus your gaze upon these three swords on my back."
- Anton: "Each blade I carry as a reminder of what you took away from me. My family. My village. My honor. I want them back!"
Intermediate Dialogue 4
- Anton: "It is done. My rage sated in blood. My promises are fulfilled, though I will never bring my loved ones back. My own crime remains."
- Anton: "I cannot return to the Ebon Vanguard. They do not know the truth. Let me follow you and aid in your struggles. And perhaps, in time, I can atone for my sins."
Reward Dialogue
- "Thank you for helping Anton. With Ragemauler dead, the Charr forces will be in disarray... for a while, anyway. I cannot have a soldier who goes off on his own missions. Perhaps if Anton were to travel with you, he could learn to control his inner demons. You should find him invaluable. He is a survivor. Just remember, even though your cause is true, beware the lure of obsession. It can drown you in darkness."
Walkthrough[ | ]
After getting the quest, map travel to Doomlore Shrine and run through the Dalada Uplands to the portal to Sacnoth Valley. You can run avoiding all mobs there but a small group of Charr Seekers. Anton is located near portal when you walk in (#1 on the map). Proceed to the waypoint (#2 on the map) and defeat Rend Ragemauler and his guards. One other small Charr mob may interfere while or after fighting Ragemauler's group.
Alternative: From Captain Langmar, run straight across Grothmar Wardowns to Sacnoth Valley (you can avoid fights along the way with little trouble). Once there, you'll need to fight through a rather large number of Charr mobs; be particularly careful when heading through the doorway to the stronghold, as there are Charr Seekers on both sides, and you won't be able to get through without aggroing at least one. Don't linger in the doorway; the Rangers use Ignite Arrows, and will easily wipe out most groups faster than you might expect.
Once you get to Anton (#1 on the map), after a small dialogue, you'll need to backtrack (you should have already cleared most of the mobs in your path). When you reach the quest marker (#2 on the map), a mob of nine Charr will spawn; defeat them, leaving only Ragemauler. After attempting to bargain and failing, he will turn hostile; any full team should have no trouble defeating him. Once he is finished, you can simply map travel back to Longeye's Ledge, and walk out the doorway to collect your reward.
Notes[ | ]
- This quest can repeated by abandoning and re-accepting for the purpose of point farming in Sacnoth, since Rend Ragemauler provides extra boss points.
Trivia[ | ]
- The Reject option could be a reference to the Ben Stiller character Mr. Furious from the movie Mystery Men.
- It can also be a reference to Homer of The Simpsons fame, as in a Tree House of Horror V episode "The Shinning".