This is a mission entry. For information on the mission outpost Venta Cemetery, see Venta Cemetery (outpost).
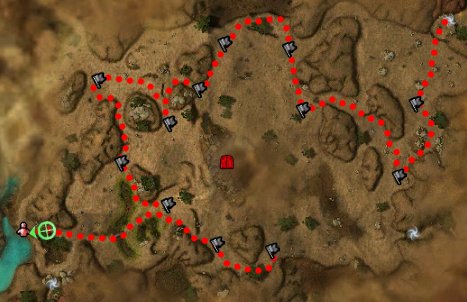
Venta Cemetery Masters map

Venta Cemetery Mission only map
Objectives
Koss must be in your party in order to enter this mission.
Lead the Sunspear Evacuees to Dajkah Inlet without being discovered by the garrison.
- Kill all the guards at the garrison posts before they sound an alert and blow your cover.
- Disarm the sentry traps before they discharge.
- *BONUS*: Neutralize all guard posts.
- x of 12 guard posts neutralized
Due to the new Guild Wars Updates, you can no longer use the "fast runner's route" of just running to Negotiate with Margrid the Sly.
Rewards
In this mission, the rewards are based on how many guard posts you capture.
Reward Guard posts captured XP Gold Skill Points Standard 0..7 1,000 100 1 Expert's 8..11 1,500 150 1 Master's 12 2,000 200 1 Hard mode Standard 0..7 1,000 200 1 Expert's 8..11 2,000 300 1 Master's 12 3,000 500 1
Walkthrough
Due to Guild Wars Updates, you can no longer run alone to the Inlet and talk to Margrid the Sly as Koss must be fairly close by. However, if Koss has running skills, he can follow the runner and the mission can still be run with a little more difficulty.
Sentry Traps: These cause an area damage effect every few seconds. They can be disabled with the Disarm Trap temporary skill, offered by Rojis at the start of the mission. The skill has a long activation time and is easily interruptible, though, so you should take out any foes in the immediate area before attempting to disarm a trap. Traps do not need to be disabled for either the primary or bonus objective of this mission.
Guard Posts: These are marked on the map by red flags. When you move in range of one, a timer will start counting down. You must defeat all of the Kournan troops stationed at the post before the timer expires, otherwise the Garrison will begin launching siege attacks at the guard post. It does not matter for the bonus whether you neutralize each post within the time limit or not.
The Garrison: It has been confirmed that alerting Morzek Garrison (indicated by a red door symbol at the centre of the map), by wandering into its attack range, can result in almost immediate death for the entire party. It has been suggested that the Garrison launches a Siege Attack on each party member and ally in range separately yet simultaneously. As party members may be grouped together within its range when the Siege Attacks begin, this would result in massive amounts of damage to every party member, and death within seconds (each character would be taking damage not only from their own Siege Attack, but from others' as well). It is not known whether this is an intended consequence, or whether this is a bug that has yet to be fixed. The best practice is to avoid the Garrison altogether, and to watch carefully for the in-mission message that will warn players when they are in danger of alerting it. For any party attempting the Master's level of completion, make sure the Guard Posts are between you and the Garrison when you attack them, and don't travel in areas that lie between Guard Posts and the Garrison. This will be more time-consuming, but safer.
- The Sunspear Evacuees are Monks, and there are 8 of them. This allows you to concentrate your party on damage dealing, aiding in the quicker killing of the sentries around the Guard Posts. They can't resurrect party members, though, so be sure your party members (or heroes) equip a few Resurrection Signets or other resurrection skills.
- The timer on each Guard Post begins when you come within range of the actual Guard Post (the selectable item), not the enemies guarding it. Since they are never standing precisely on the selectable item, you can usually buy extra time by choosing the right angle of attack, especially in a group without melee fighters.
- A character with Wild Blow, Rigor Mortis, or similar skills will greatly help you killing the Kournan Bowmen, as they use Whirling Defense. You can also make use of Splinter Shot or other attack skills that produce additional effects upon being blocked.
- To quickly clear out the group at each guard post, bring a Domination Mesmer with Spiritual Pain. As each guard post has a Kournan Bowman who uses Infuriating Heat it is possible for a lone mesmer to deal a large amount of armor-ignoring damage to the entire group in a relatively short time. A high Fast Casting attribute is advantageous, as is good energy management, for example using a Me/E with Glyph of Lesser Energy.
- Open the minimap (default key "U") to see the locations of all the watchtowers for the bonus. Take care not to get too close to the Garrison.
Creatures
Allies
 18 Margrid the Sly
 20 Sunspear Evacuee
- 20 Rojis
Monsters
- 20 Kournan Guard (axe)
- 20 Kournan Bowman
- 20 Kournan Spotter
- 20 Kournan Priest
- 20 Kournan Oppressor
- 20 Kournan Seer
- 20 Kournan Scribe
- 20 Guard Post Commander
- 20 Kournan Phalanx
- 20 Kournan Zealot
- 28 Acolyte of Lyssa
Dialogues
Inside the mission
| Rojis: | "The situation just got a bit more interesting. Our Kournan friends thought we might be coming this way and they were kind enough to leave sentry traps in our path." |
| Rojis: | "Talk to me when you're ready to learn how to disable one of these things." |
| Rojis: | "To disable a sentry trap, first you must appraoch it. It will activate and you'll have a short window of time to shut it down using the Disable Sentry Trap skill." |
| Rojis: | "Be careful out there." |
=Ending cutscene
| Koss: | "Magrid! Got my boat?" |
| Margrid: | "That all depends, my friend. Got my money?" |
| Koss: | "You sure you want the money? My friendship is worth more than mere gold, isn't it?" |
| Margrid: | "You're charming, Koss, but I can't spend charming. The money, please." |
| Margrid: | "It's always a pleasure doing business with honest people. Welcome aboard." |
| <party leader>: | "Koss, She's a corsair. Can we trust her?" |
| Koss: | "Only for as long as the money lasts. But for the moment, you can relax. We're going home." |
| Bayel: | "You let those Sunspears escape?" |
| Kournan Captain: | "There were only a few of them sir! We've already captured and killed most of their forces" |
| Bayel: | "Only a few? You idiot! Captain!" |
| Kournan Captain: | "Yes sir!" |
| Bayel: | "Increas the patrols! Burn the villages that help these traitors! Send word to the Warmarshal!" |
| Kournan Captain: | "Yes sir. What should I tell her?" |
| Bayel: | "Tell her to send me... the Hunger" |
Follow-up
- Upon completion of the mission, players will find themselves in: Kamadan, Jewel of Istan
- To continue the storyline, take on the following Primary Quest: The Council is Called
Notes
- Normally, when a guard post is captured the flag will turn gray. If the timer expires and the guard post calls in siege support the flag will remain red even after the guard post is captured. This will not prevent the bonus from being achieved.
- If you do the mission with only heroes and henchmen who are also available in Kamadan, they will remain in your party when you are transported to Kamadan at the end of the mission, even if the party is larger than 4. This can be exploited to make vanquishing the Plains of Jarin much easier.
- If you are not worried about Master's, you can easily run through this mission. Considering you have 8 monks with you, it's very simple. Consider bringing heroes for body-blocking or aggro-drawing.
- You cannot complete this mission without Koss being with you at the end.