Bot ishmael@legacy41684885 (talk | contribs) m (→Hard Mode: adding navbox using AWB) |
@DeletedUser40697545 (talk | contribs) (Added HQ vanquishing picture + tips and boss locations) |
||
| (7 intermediate revisions by 5 users not shown) | |||
| Line 1: | Line 1: | ||
| + | {{LocationInfo |
||
| − | {{location box |
||
| ⚫ | |||
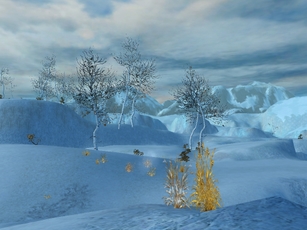
| − | |image=[[Image:Witman's_Folly_Scenery.jpg|200px]] |
||
| − | + | | campaign = Prophecies |
|
| ⚫ | |||
| ⚫ | |||
| + | | pixels = 72388 |
||
| ⚫ | |||
| − | + | | neighbors = Droknar's Forge; Port Sledge |
|
| + | | services = Collector |
||
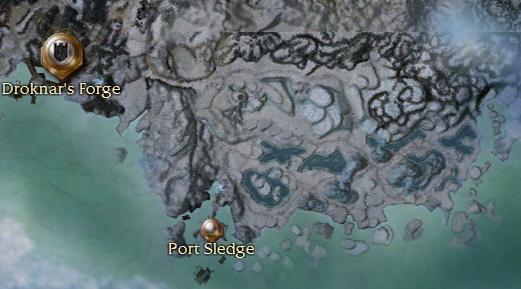
| − | |map=[[Image:Witman's Folly map.jpg|200px]] |
||
| + | }}{{Zaishen_Quest}} |
||
| − | }} |
||
| − | == |
+ | == Description == |
| − | + | [[Witman's Folly]] is named after the Ascalonian explorer [[Marshall Whitman]]. The terrain is broken and chaotic, and due to the fact that it is so close to the water, it is difficult to tell how much of it is on solid ground and how much is icebergs. Most of the enemies here are [[Grawl]]. |
|
| − | == |
+ | == Exits == |
| + | * Northwest: [[Droknar's Forge]] |
||
| − | [[Droknar's Forge]] is to the north west, and you will find [[Port Sledge]] to the southwest. |
||
| + | * Southwest: [[Port Sledge]] |
||
== Bestiary == |
== Bestiary == |
||
=== Monsters === |
=== Monsters === |
||
| + | * [[Grawl]] |
||
| − | |||
| − | * |
+ | ** {{w}}22 (26) [[Grawl (Shiverpeaks)|Grawl]] |
| + | ** {{n}}22 (26) [[Grawl Crone]] |
||
| − | * [[Azure Shadow]]s, in the east, are level 22. Like most shadows, they spawn once you enter their [[aggro]] circle. |
||
| + | * [[Shadow]]s |
||
| + | ** {{mo}}22 (26) [[Azure Shadow]] |
||
=== Bosses === |
=== Bosses === |
||
| − | |||
*{{Me}} [[Sniik Hungrymind]], ([[Imp]]) ([[Energy Drain]]) |
*{{Me}} [[Sniik Hungrymind]], ([[Imp]]) ([[Energy Drain]]) |
||
*{{W}} [[Sakalo Yawpyawl]], ([[Grawl]]) ([["Victory is Mine!"]]) |
*{{W}} [[Sakalo Yawpyawl]], ([[Grawl]]) ([["Victory is Mine!"]]) |
||
| Line 31: | Line 33: | ||
=== Animals === |
=== Animals === |
||
| + | * [[Black Bear]] |
||
| − | |||
| − | You can capture the [[Black Bear]] pet in this area. |
||
=== Collectors and Traders === |
=== Collectors and Traders === |
||
| − | |||
* [[Vania Sewell]] is in the north eastern corner of the area. |
* [[Vania Sewell]] is in the north eastern corner of the area. |
||
* [[Mag Ironwall]] is in the south western corner of the area, just outside the entrance to [[Port Sledge]]. |
* [[Mag Ironwall]] is in the south western corner of the area, just outside the entrance to [[Port Sledge]]. |
||
| − | == |
+ | == Notes == |
| + | [[File:Witman's Folly - Vanquished (Tips and Bosses)1.0.png|thumb|250px|Witman's Folly vanquished.]] |
||
| − | This is an excellent zone to walk around in, just with you, a couple of friends, or a few henchmen, and gather elite skills. The zone is small, easy to move around in, and has a lot of trivial monsters, which are quite straightforward to fight. The eastern end of the zone has some azure shadows which pop out of the ice as you walk by, but are not in sufficiently large numbers to cause any trouble. Either way, do not rush forward towards a group of visible mobs in the eastern part of the zone, as you may find yourself fighting three groups instead of one at a time. |
||
| − | This is |
+ | * This is a favorite area for many chest runners; many monsters can be avoided (be careful of Azure Shadows), and 3 [[Shiverpeak Chest]]s ([[Locked Chest]] in [[Hard mode]]) spawn. |
| + | * [[Vanquisher]]s must defeat 88-112 foes in this area. |
||
| − | |||
| ⚫ | |||
| − | == Hard Mode == |
||
| + | ** The eastern part of the map is only inhabited by two Imp bosses and their Azure Shadow minions. Be careful approaching them as hidden Azure Shadows may popup during your approach. It is suggested to clear the entire western area of the Grawls before venturing east. |
||
| ⚫ | |||
{{Prophecies Explorable Areas}} |
{{Prophecies Explorable Areas}} |
||
[[Category:Southern Shiverpeaks]] [[Category:Explorable areas (Prophecies)]] |
[[Category:Southern Shiverpeaks]] [[Category:Explorable areas (Prophecies)]] |
||
| + | |||
| + | [[de:Witmans Torheit]] |
||
Latest revision as of 14:53, 25 August 2011
| Witman's Folly | ||||||||||
|---|---|---|---|---|---|---|---|---|---|---|
| ||||||||||
| Explorable area | ||||||||||
| ||||||||||
| Map | ||||||||||
|

This article has an associated Zaishen Challenge Quest.
Description[ | ]
Witman's Folly is named after the Ascalonian explorer Marshall Whitman. The terrain is broken and chaotic, and due to the fact that it is so close to the water, it is difficult to tell how much of it is on solid ground and how much is icebergs. Most of the enemies here are Grawl.
Exits[ | ]
- Northwest: Droknar's Forge
- Southwest: Port Sledge
Bestiary[ | ]
Monsters[ | ]
- Grawl
 22 (26) Grawl
- 22 (26) Grawl Crone
- Shadows
- 22 (26) Azure Shadow
Bosses[ | ]
- Sniik Hungrymind, (Imp) (Energy Drain)
- Sakalo Yawpyawl, (Grawl) ("Victory is Mine!")
- Karobo Dimdim, (Grawl) (Plague Signet)
- Ipillo Wupwup, (Grawl) (Unyielding Aura)
- Maak Frostfriend, (Imp) (Mind Freeze)
- Alana Kepkep, (Grawl) (Glimmering Mark)
- Salani Pippip, (Grawl) (Poison Arrow)
Animals[ | ]
Collectors and Traders[ | ]
- Vania Sewell is in the north eastern corner of the area.
- Mag Ironwall is in the south western corner of the area, just outside the entrance to Port Sledge.
Notes[ | ]


1.0.png)
Witman's Folly vanquished.
- This is a favorite area for many chest runners; many monsters can be avoided (be careful of Azure Shadows), and 3 Shiverpeak Chests (Locked Chest in Hard mode) spawn.
- Vanquishers must defeat 88-112 foes in this area.
- There is a group near Droknar's Forge that will circle the map in a clockwise path that might be missed.
- The eastern part of the map is only inhabited by two Imp bosses and their Azure Shadow minions. Be careful approaching them as hidden Azure Shadows may popup during your approach. It is suggested to clear the entire western area of the Grawls before venturing east.